
4 foot Retaining Walls: When Geogrid Is Needed, Homeowners Ask for PE
- Installed per sq ft (wall face)
- $20–$45
- Typical project total
- $4,000–$15,000
4 foot Retaining Walls: When Geogrid Is Needed, Homeowners Ask for PE
Any block retaining wall taller than about four feet, holding back a slope, or carrying a driveway or patio surcharge needs geogrid reinforcement. The core rule engineers use: embed each layer a significant portion of the wall’s height, with a minimum length considered adequate, following FHWA and NCMA guidance. Measure your wall height first, then talk to an engineer if you’re anywhere near that 4 foot line.
TL;DR:
- Most retaining walls over four feet tall require geogrid reinforcement, especially if carrying surcharge loads or built on poor or weak soils.
- Proper installation involves embedding each layer at 60 to 80 percent of the wall height and tensioning the grid before backfilling to ensure maximum strength.
- Using uniaxial geogrid made of HDPE or polyester with long-term design strength ratings is essential for lasting stability.
- A large portion of wall failure stems from poor compaction, inadequate drainage, and short embedment, not just material choice.
- Always verify drainage components, embedment length, and tensioning practices in writing before construction begins to avoid costly mistakes.
Table of Contents
- What Is Retaining Wall Geogrid and How Does It Work?
- When Do You Actually Need Geogrid on a Retaining Wall?
- Uniaxial vs. Biaxial Geogrid: Which Type Do You Need?
- Getting the Installation Right: Embedment, Spacing, and Drainage
- What Should You Ask a Contractor Before They Start?
- How GC Signature Outdoors Approaches Every Retaining Wall Build
- Quick Checklist Before You Move Forward
- Maintenance and the Real Causes of Retaining Wall Failure
- What Affects Stability in a Geogrid-Reinforced Wall?
- Does Soil Type Change How Geogrid Performs?
- Geogrid vs. Soil Nails and Tiebacks: How Do They Compare?
- What Codes and Standards Govern Geogrid Retaining Walls?
- Why Most Retaining Wall Advice Oversimplifies the Height Rule
- Ready to Build a Retaining Wall That Actually Holds?
- Sources
- FAQ
What Is Retaining Wall Geogrid and How Does It Work?
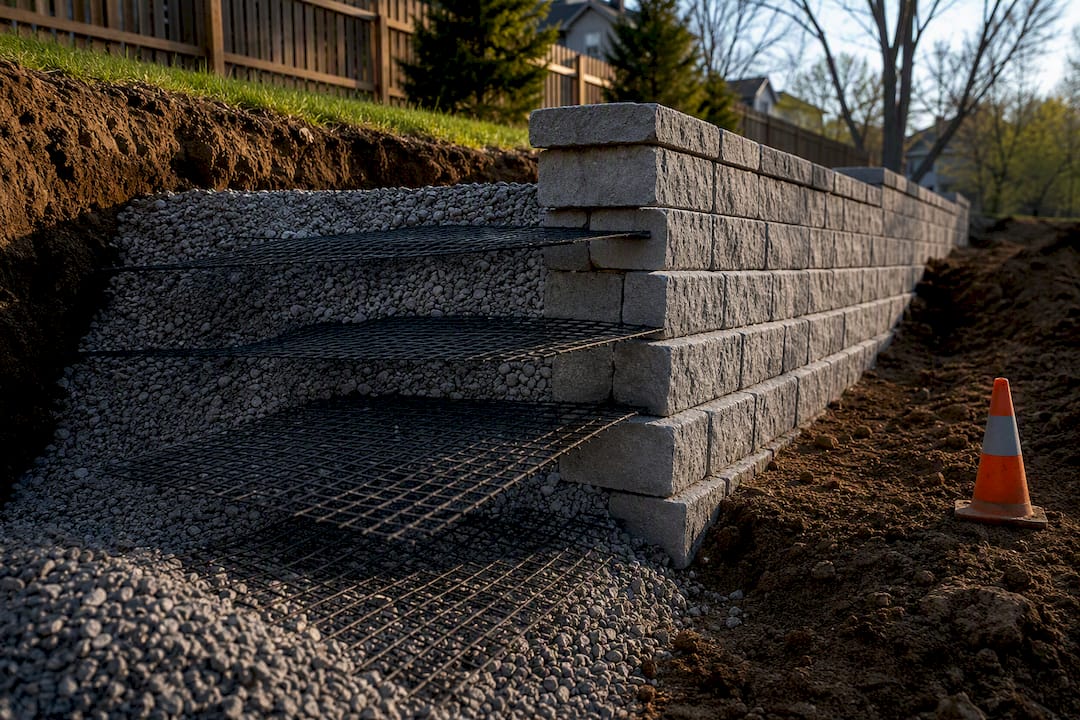
Geogrid is a polymeric mesh, usually a grid of interlocking ribs, that gets laid horizontally between courses of block and buried into the soil behind the wall. It doesn’t act like rebar inside concrete. It works by locking into the crushed stone backfill above and below it, so when soil tries to push outward, the grid grabs the stone and transfers that force back into the hillside instead of onto the wall face.
Think of a sand castle built by packing wet sand into a bucket with a few sticks pressed in horizontally. Pull on a stick and you don’t just move the stick. You drag a chunk of the sand mass with it. That’s the same soil-geogrid-facing composite behavior Tensar’s design guidance describes: the reinforced soil and the block face start acting as one thick, coherent mass rather than a thin wall trying to hold back everything on its own.
Geogrid solves a lateral stability problem, not a water problem. Its benefits show up in a few specific ways:
- Increases the effective mass and tensile capacity of the soil behind the wall.
- Allows taller walls than gravity-only block construction can safely achieve.
- Distributes surcharge loads (driveways, patios, slopes above the wall) more evenly.
- Reduces bulging and face rotation over the wall’s service life.
None of that replaces drainage. A wall can have perfect geogrid and still fail if water builds up behind it, so the two systems have to work together.
When Do You Actually Need Geogrid on a Retaining Wall?
Height is the first filter, but it’s not the only one. Run through this before assuming your wall is fine without reinforcement:
- Under 3 feet: geogrid is rarely required for a simple gravity wall on stable, well-drained soil.
- 3 to 4 feet: reinforcement becomes situational. Check for surcharge loads, slope above the wall, or soft soil before skipping it.
- 4 feet and taller: geogrid is typically required, and many local codes mandate an engineer-stamped design at this height.
- Any height with a surcharge: a driveway, patio, pool, or structure load behind the wall pushes the reinforcement requirement lower, sometimes well under 4 feet.
- Weak or expansive soils, a retained slope above the wall, nearby foundations, or unreliable drainage: any one of these justifies an engineered review even on a shorter wall.
Height alone is only a first screening tool, not the final word. When two or more of these factors stack up, treat it as a signal to get a professional design rather than guessing.
Uniaxial vs. Biaxial Geogrid: Which Type Do You Need?
Retaining walls almost always use uniaxial geogrid, because the dominant stress on a wall runs in one direction: perpendicular to the wall face, pulling the reinforced soil mass outward. Uniaxial grids are engineered with their strongest ribs running that one way. Biaxial geogrid distributes strength in both directions and gets used mainly under roads, driveways, and parking areas where loads come from every angle, not for wall reinforcement.
Material matters almost as much as geometry. The two you’ll run into:
- HDPE (high-density polyethylene): the traditional choice for uniaxial wall geogrid, known for long-term creep resistance under sustained load.
- PET (polyester): increasingly common, valued for high tensile strength and good performance in a wide range of soil chemistries.
When you’re reviewing a spec sheet or a contractor’s bid, ask for the long-term design strength (LTDS) rating, not just the grid’s raw tensile strength off the roll. Raw strength tells you what the material can handle for a moment; LTDS accounts for creep and soil interaction over decades, which is what your wall will actually experience. Also confirm the roll width matches your embedment length so the contractor isn’t splicing pieces to stretch coverage.
Getting the Installation Right: Embedment, Spacing, and Drainage
This is where most retaining wall problems actually start, and it’s mostly invisible once the wall is backfilled. FHWA and NCMA guidance puts embedment length at 60 to 80% of wall height, with a hard floor of 4 feet regardless of how short that percentage works out to be. A 10 foot wall, for example, typically needs a substantial length of grid running back into the hillside on every reinforced course.
Beyond embedment length, five installation details separate a wall that lasts decades from one that starts leaning within a few years:
- Vertical spacing: geogrid layers usually go in every 16 to 24 inches of wall height, tied to the block course height your system uses.
- Backfill material: clean, open-graded #57 crushed stone in the reinforced zone and drainage column, never native clay or dirty fill.
- Filter fabric: nonwoven fabric wraps the drain stone to keep fine soil particles from migrating in and clogging it over time.
- Drain pipe placement: a perforated pipe at the base of the drainage zone, sloped to a daylight outlet, carries water away before it ever pressurizes the wall.
- Compaction in lifts: backfill goes in and gets compacted in controlled layers, typically 8 to 12 inches at a time, never dumped and packed all at once.
Pro Tip: Tensioning the grid before backfilling is one of the most skipped steps on a job site, mostly because it’s fast to fake and hard to inspect after the fact. A taut, straight grid interlocks with the crushed stone far better than one left loose or wrinkled, and that tension is part of how the system reaches its designed tensile capacity.
A properly installed geogrid system often adds a modest percentage to initial construction cost, yet a wall built without it, or with shortcuts on embedment and compaction, tends to need far more expensive repair or rebuilding down the line. Allan Block’s installation guidance makes a point worth repeating: more geogrid layers only improve how coherent the reinforced mass feels. Longer embedment is what actually increases its mass. You can’t compensate for short embedment by adding extra layers.
If you want a deeper look at how the drainage half of this system should be built, our guide on retaining wall drainage components walks through the stone, pipe, and fabric layout in more detail.
What Should You Ask a Contractor Before They Start?
A written spec beats a verbal promise every time on a project this permanent. Before signing off on a quote, get clear answers on a handful of specifics:
- Is this grid uniaxial or biaxial, and what’s the long-term design strength rating?
- What embedment length will each layer actually have, measured from the wall face?
- What backfill material goes into the reinforced zone, and will it be #57 stone or something cheaper?
- Will the grid be tensioned before backfill goes on top of it, and how is that verified?
- Do you have manufacturer installation instructions for this specific product, or are you working from memory?
Red flags worth walking away from: no mention of drainage stone or pipe, embedment that doesn’t scale with wall height, no tensioning step in the process, or backfill that includes native clay. For any wall approaching 4 feet, a surcharge load, or a retained slope, ask whether the design has been reviewed or stamped by a professional engineer, and check your local jurisdiction’s retaining wall approval NSW permit requirements before work begins.
How GC Signature Outdoors Approaches Every Retaining Wall Build
Every retaining wall GC Signature Outdoors LLC builds starts with an engineered layout matched to the site’s actual soil and slope conditions, not a generic block count. From there, the process follows the same checklist on every job:
- Excavate to undisturbed native soil before any base course goes down.
- Keep the drainage zone clean, with wrapped #57 stone and a properly sloped drain pipe.
- Tension every geogrid layer before backfilling, rather than leaving it loose under the stone.
- Compact backfill in controlled lifts instead of dumping and packing all at once.
We’ve also written about what happens when those steps get skipped in our piece on common retaining wall failure causes, which covers the inspection points a contractor should be checking before problems surface.
As for DIY: a wall under 3 feet with good drainage and stable soil is a reasonable weekend project for a capable homeowner. Once you’re near 4 feet, carrying a surcharge, or holding back a slope, the risk of a costly rebuild goes up fast enough that hiring a professional, and checking your local permit rules, is the safer call.
Quick Checklist Before You Move Forward
Measure your wall height, screen for surcharge and soil red flags, confirm embedment meets 60 to 80% of height with drainage stone and pipe specified, and get a PE review for anything near 4 feet or holding a slope. Put it all in writing and hand it to your contractor before work starts.
Maintenance and the Real Causes of Retaining Wall Failure
Geogrid-reinforced walls don’t need much ongoing maintenance if they’re built right, but they do need occasional attention. Walk the base after heavy rain and check that water is exiting the drain outlet rather than seeping through the face or pooling at the toe of the wall. Watch for any bulging, leaning, or separation between blocks, especially in the first two years while the reinforced soil mass settles.
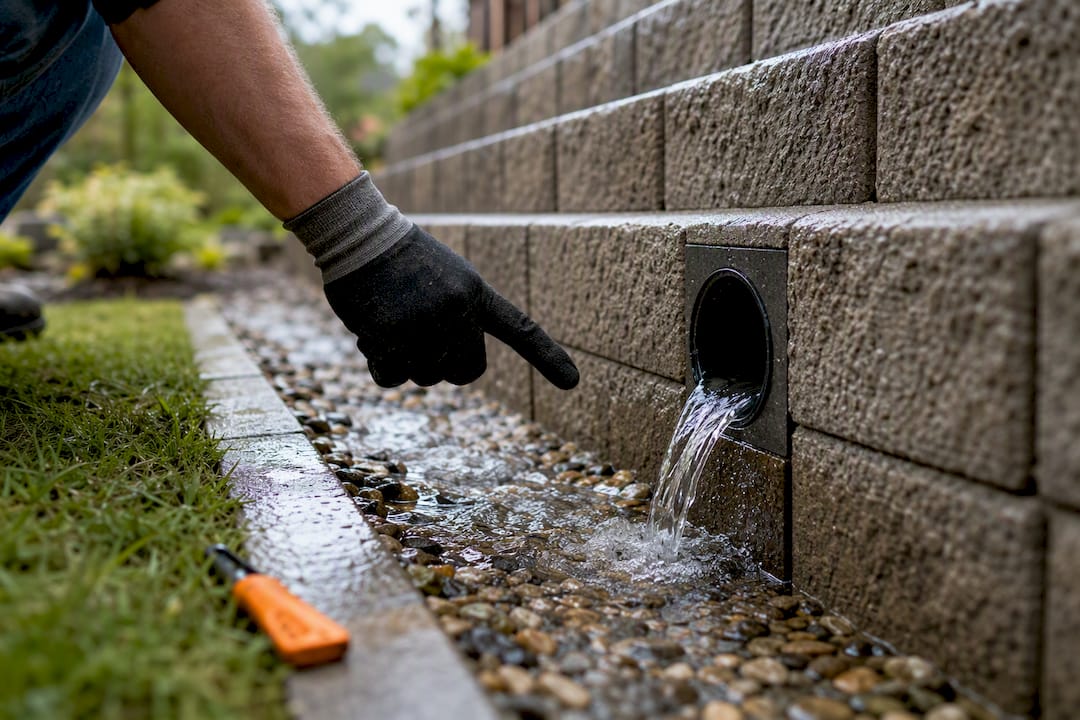
Nearly every serious failure traces back to one of three root causes, and they compound each other. Poor compaction leaves voids in the backfill that let soil shift and settle unevenly, which puts uneven load on the geogrid layers above and below. Inadequate drainage lets hydrostatic pressure build up behind the wall, a force the geogrid was never designed to resist because its job is holding back soil, not water. Insufficient embedment means the reinforced mass simply isn’t big enough or heavy enough to resist the pressure trying to push it outward, no matter how many layers you stack.
Contractor field guidance consistently points to these same three issues as the leading causes of premature wall failure, and all three are baked in at construction, not something that develops later from neglect. That’s the uncomfortable part: by the time you see a bulge or a crack, the mistake usually happened months or years earlier, buried under the backfill.
What Affects Stability in a Geogrid-Reinforced Wall?
Wall stability comes down to a handful of interacting factors, and geogrid only fixes one piece of that puzzle. Wall batter, or the slope of the wall face itself, changes how much of the load transfers into the reinforced soil versus staying on the facing units; a slightly set-back wall generally performs better than a perfectly vertical one under the same soil conditions.
Soil shear strength behind the wall determines how much lateral pressure the geogrid actually has to resist. Loose, sandy fill pushes differently than dense, well-graded backfill, which is part of why the spec calls for clean crushed stone rather than whatever soil came out of the excavation. Load conditions matter just as much: a static wall holding back a flat yard behaves very differently than one carrying a driveway, a pool, or a slope rising above the retained face. Each of those adds surcharge that has to be accounted for in how much embedment and how many layers of grid the design calls for.
Segmental retaining wall design methods built around FHWA and NCMA standards treat tensile strength and pullout resistance as the two primary internal stability checks, because those are the failure modes geogrid is specifically there to prevent. Get those two checks wrong, and the wall’s exterior can look fine right up until it isn’t.
Does Soil Type Change How Geogrid Performs?
Geogrid doesn’t work the same way in every soil, and this is where a lot of otherwise well-installed walls run into trouble years later. The mesh needs backfill it can actually interlock with, which is why the design spec calls for clean, open-graded crushed stone like #57 stone rather than native soil dug from the site.
Clay is the material to watch most closely. It holds water, swells and shrinks with moisture changes, and doesn’t lock into the grid’s apertures the way angular crushed stone does. Backfilling directly against a geogrid layer with native clay defeats much of the reinforcement’s purpose, even if the grid itself is rated correctly. Sandy or silty soils drain better than clay but still don’t interlock with the grid as effectively as crushed, angular stone.
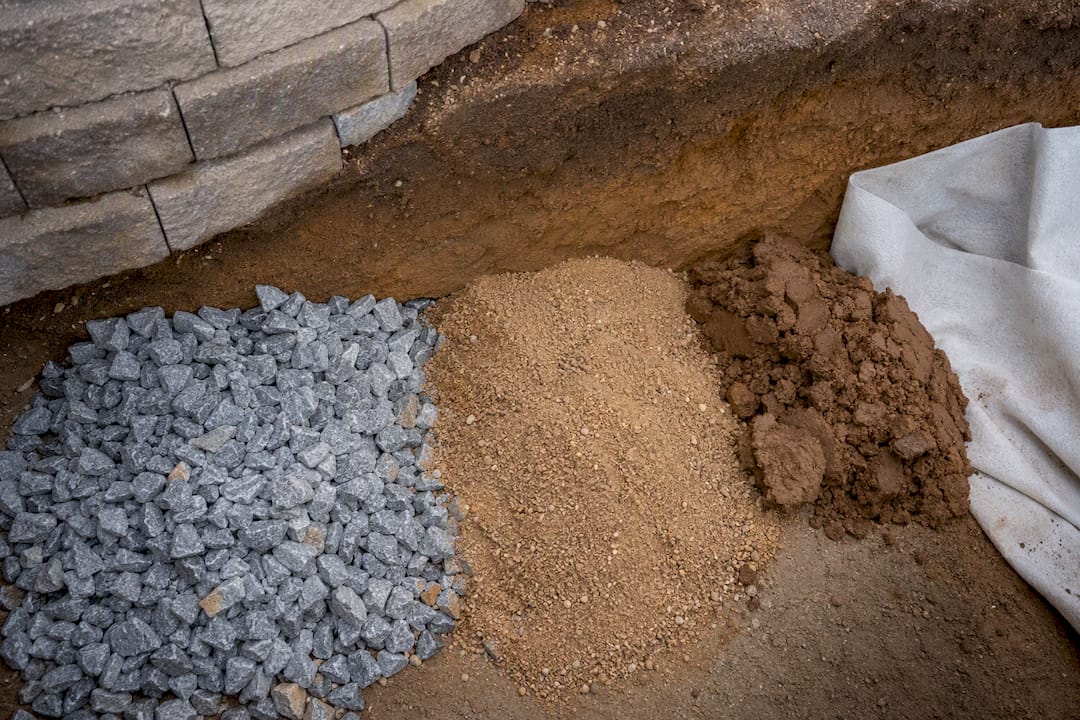
That’s part of why the filter fabric detail matters so much. Nonwoven fabric wrapped around the drain stone keeps fine clay and silt particles from migrating into the drainage zone over time, a slow process that’s invisible until the wall starts showing movement. Skipping that fabric doesn’t cause an immediate problem. It causes one three or five years down the road, once enough fine soil has worked its way into the stone and choked off the drainage path the geogrid depends on to keep hydrostatic pressure off the wall.
Geogrid vs. Soil Nails and Tiebacks: How Do They Compare?
Geogrid isn’t the only reinforcement method for holding back soil, though it’s the one most homeowners will encounter on a residential block wall project. Soil nails and tiebacks solve a related but different problem, and they show up in different situations.
Soil nails are steel bars grouted into drilled holes behind an existing or new wall face, typically used to stabilize cut slopes or retrofit walls where there isn’t room to excavate and rebuild with a full reinforced soil zone. Tiebacks work on a similar principle but anchor into stable soil or rock further back, often tensioned mechanically, and tend to show up on larger commercial or infrastructure projects rather than residential retaining walls.
For most residential block or segmental walls, geogrid is the more practical and cost-effective reinforcement method, because it works with the wall’s own construction process rather than requiring separate drilling and grouting equipment. Soil nails and tiebacks make more sense when excavation space is limited, when a wall needs to be stabilized without rebuilding it, or on taller commercial structures where reinforced soil mass alone isn’t sufficient. For a typical backyard or driveway retaining wall project, geogrid paired with proper drainage is almost always the right tool for the job.
What Codes and Standards Govern Geogrid Retaining Walls?
Two organizations drive most of the technical guidance behind residential and light-commercial geogrid design in the United States. The National Concrete Masonry Association (NCMA) publishes design methodology specific to segmental retaining walls, covering internal stability checks like tensile strength and pullout resistance alongside external stability factors like sliding and overturning.
The Federal Highway Administration (FHWA) publishes broader guidance on mechanically stabilized earth (MSE) structures, which is where much of the embedment length and reinforcement spacing logic used on smaller residential walls originally comes from. Most local building departments reference one or both of these frameworks, directly or indirectly, when reviewing permit applications for walls above a certain height threshold.
Local code amendments still matter more than either national standard on their own. Some jurisdictions require an engineer-stamped design and a permit at 4 feet; others set that line differently, or trigger it based on surcharge rather than height alone. Before finalizing any wall design near that threshold, check with your local building department directly rather than assuming a national guideline automatically applies as written in your area.
Why Most Retaining Wall Advice Oversimplifies the Height Rule
The height chart most homeowners find online treats 4 feet like a hard line: reinforce past it, skip it below it. That’s a reasonable starting screen, but it hides the more useful truth in the FHWA and NCMA guidance: height is a proxy for load, not the load itself. A 3 foot wall under a sloped backyard carrying runoff from a neighbor’s property can need more reinforcement than a 4 foot wall on flat, well-drained ground.
What gets underestimated even more is installation quality. Homeowners spend real time comparing block styles and colors, then treat embedment length and compaction as boring technical details to leave entirely to the crew. That’s backwards. The grid’s tensile rating on a spec sheet means little if it goes in loose, unbuffered by proper backfill, or embedded a foot short of what the wall height calls for. The material choice matters less than most bidding conversations suggest; the installation discipline behind it matters more.
If there’s one thing worth prioritizing above all else on a project like this, it’s asking for embedment length and drainage detail in writing before work starts, not after. That single question filters out more bad bids than any amount of researching grid brands ever will.
Ready to Build a Retaining Wall That Actually Holds?
Retaining walls built with engineered layouts, tensioned geogrid, clean drainage stone, and compaction done in controlled lifts follow best practices to avoid issues years later. Proper installation discipline is the difference between a wall that needs attention once and one that requires ongoing maintenance.

Whether you’re dealing with a sloped backyard, a driveway retaining a cut, or a patio project that needs a wall built into the plan from the start, our team can walk your site and tell you honestly whether geogrid reinforcement applies before any work begins. Get a look at recent builds on our retaining wall project page, or reach out through Sgclandscape to schedule a site visit and get a written spec for your project.
Sources
- FHWA research publication — embedment guidance
- Tensar — geogrid retaining walls guidance
- Allan Block installation manual — working with geogrid
- Brick & Stone Master — retaining wall geogrid installation guide
FAQ
Do I need geogrid for a 4-foot retaining wall?
Most 4 foot walls need geogrid reinforcement, and many local codes require an engineer-stamped design at that height. If your wall also carries a surcharge or holds back a slope, treat reinforcement as required rather than optional.
When should you use geogrid on a retaining wall?
Use geogrid whenever a wall reaches roughly 3 to 4 feet or taller, carries a surcharge load like a driveway or patio, holds back a slope, or sits on weak or poorly drained soil. Height alone is a useful first screen, but any of those other factors can trigger the need for reinforcement even on a shorter wall.
What is geogrid used for in retaining walls?
Geogrid interlocks with compacted backfill to create a reinforced soil mass that has far more tensile strength than the soil alone, which lets a wall resist lateral pressure and stand taller than a gravity-only design could safely manage.
How much geogrid do I need for a retaining wall?
A 10 foot wall, for example, generally needs 6 to 7 feet of embedment on each reinforced course.
Recommended
Ready to get started in Kansas City's Northland?
GC Signature Outdoors serves Smithville, Platte City, Kearney, Liberty, and surrounding areas.