
Patio Slope Drainage: The Slope Rule That Prevents Standing Water
Patio Slope Drainage: The Slope Rule That Prevents Standing Water
That’s the standard the concrete and hardscape trades build to, and it’s the number to hand a contractor or use yourself before you set a single form. The one rule that overrides everything else: the patio must slope away from your house for at least the first 10 feet, or route to a proper drain. Never toward the foundation, not even a little.
Below that, water sits.
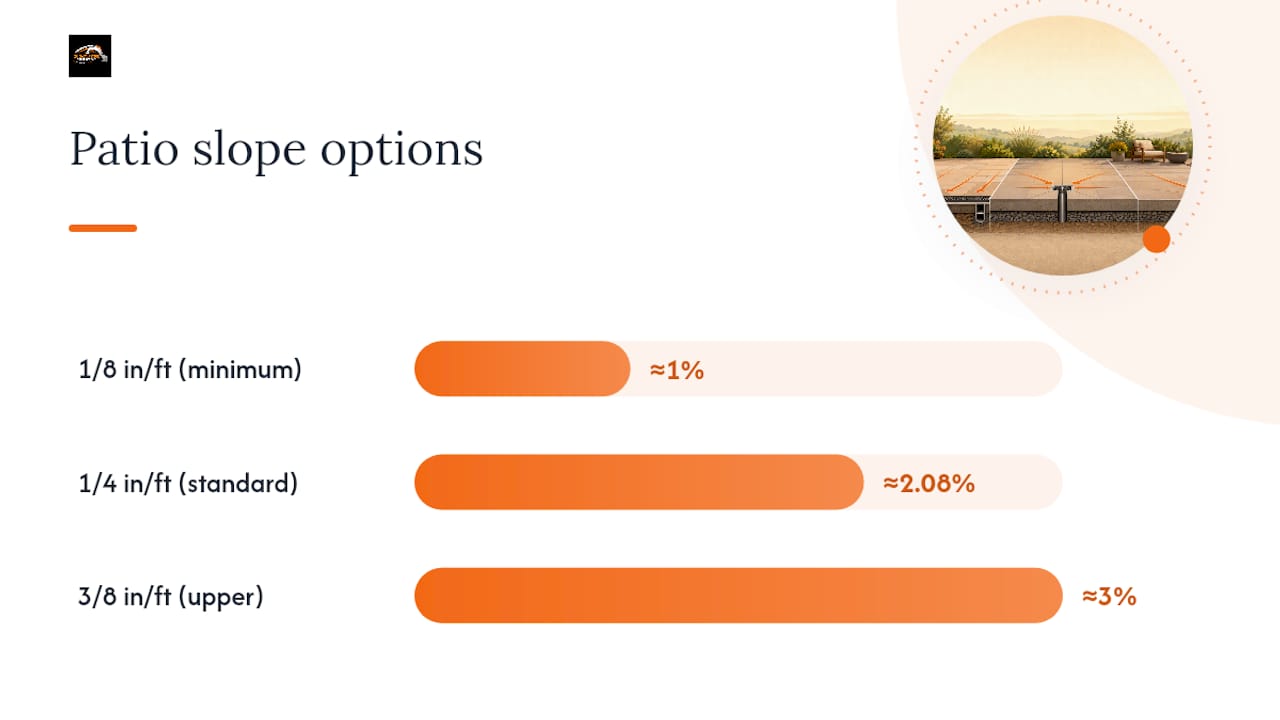
- Standard slope: 1/4" per foot (≈2%)
- Absolute minimum: 1/8" per foot (≈1%), site-dependent
- Direction: away from the house for 10 feet minimum, or to an approved outlet
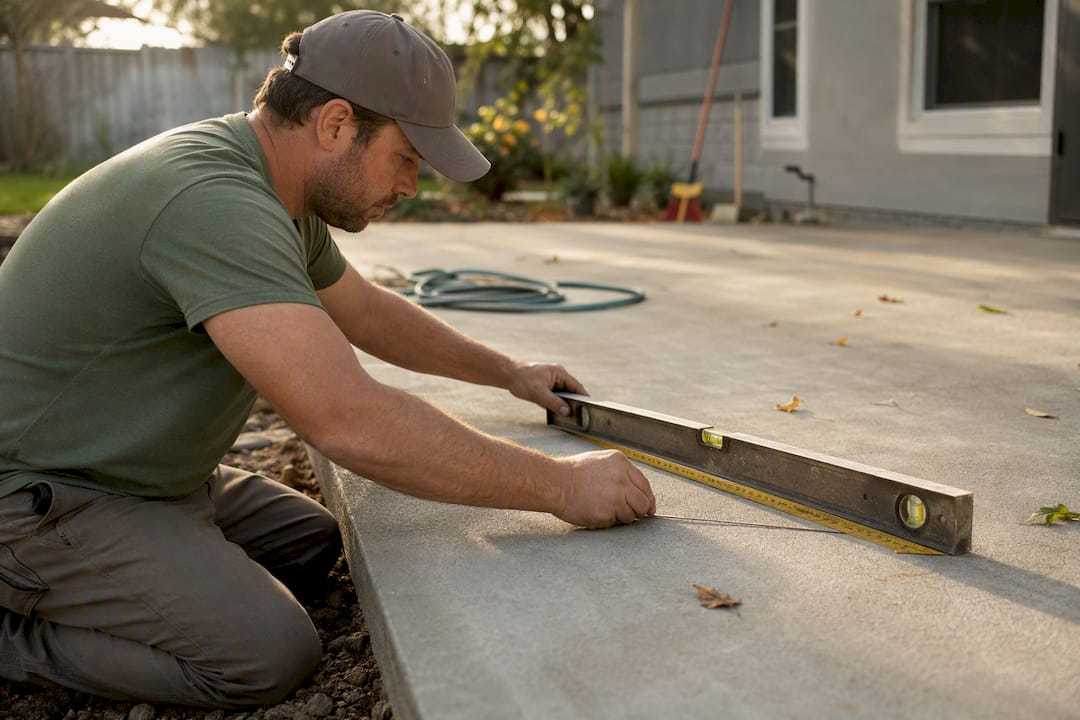
Setting slope by eye is how patios end up ponding by year two. Use a string line and a line or laser level, then calculate total drop as run in feet multiplied by 0.25 inch. A 12 foot run at the standard grade needs several inches of fall from the house to the outer edge. That single calculation, done before the forms go in, is the difference between a patio that drains and one that doesn’t.
Key Takeaways
Proper patio slope drainage depends on a 1/4 inch per foot grade directed away from the house for at least 10 feet, verified with real measurement, not visual estimation.
| Point | Details |
|---|---|
| Standard slope rule | Grade patios at 1/4" per foot (≈2%), with 1/8" per foot as an absolute, situational minimum. |
| Direction is non-negotiable | Water must move away from the foundation for at least the first 10 feet or to an approved drain. |
| Measure, don’t eyeball | Use a string line and level, then calculate drop as run in feet times 0.25 inch. |
| Material changes the math | Concrete and sand-set pavers need the full standard slope; permeable pavers allow lower surface grade with an engineered base. |
| Call a pro near the foundation | GC Signature Outdoors LLC handles grading plans, slope verification, and full patio construction for projects near the house or requiring permits. |
Table of Contents
- What Code and Industry Standards Say About Patio Slope Drainage
- How to Measure and Set Slope on a Patio Correctly
- Does Your Patio Material Change How Much Slope You Need?
- Where Should Patio Runoff Actually Go?
- Fixing a Patio That Already Holds Water
- Pro Tips From GC Signature Outdoors on Getting Slope Right the First Time
- Editorial Take: What Most Patio Guides Get Wrong About Slope
- Get Your Patio Drainage Done Right the First Time
- Primary Sources and Further Reading
- Sources
- FAQ
What Code and Industry Standards Say About Patio Slope Drainage
The 1/4 inch per foot number isn’t arbitrary. It comes from a consistent thread running through building science guidance and trade standards, and it holds up whether you’re pouring concrete or setting pavers.
Building science guidance from the Building America Solution Center calls for positive drainage away from the foundation for the first 10 feet of any patio, walkway, or driveway, with at least 6 inches of total drop across that span when the site allows it. Where a patio butts right up against the house, this isn’t a suggestion. Water that pools against a foundation wall works its way into basements, crawl spaces, and slab edges over a few seasons, not overnight.
Converting between the two common ways slope gets described trips up a lot of homeowners:
- 1/8" per foot ≈ 1% (bare minimum, situational)
- 1/4" per foot ≈ 2.08% (the practical standard, per BuildMaterialCalc’s drainage pitch calculator)
- 3/8" per foot ≈ 3% (upper comfort limit before furniture starts feeling tilted)
Run the math on a real patio. A 12 foot deep slab at the standard 1/4 inch per foot grade needs about 3 inches of total drop from the house side to the far edge. Stretch that to 20 feet and you’re looking at 5 inches, which starts to matter for step heights and door thresholds.
Local conditions shift these numbers. Clay soil that drains poorly, a patio tucked into a low point in the yard, or permeable pavers with an engineered gravel base underneath can justify adjusting the minimum, but “adjusting” doesn’t mean ignoring the 10 foot rule near the foundation. That part doesn’t flex.
How to Measure and Set Slope on a Patio Correctly
A 4 foot level tells you whether a small section is flat. It tells you nothing about whether the whole patio actually drains toward the right spot, because a 20 foot slab can have a dozen bubble-flat sections that still trap water in a shallow basin somewhere in the middle. You need tools that measure the whole run at once.
What you need:
- A tape measure
- A line level or laser level
- Mason’s string and stakes
- A basic calculator (or your phone)
Step-by-step process:
- Mark your high point (usually against the house) and your low point (the drainage edge or outlet).
- Stretch a string tight between stakes at both points.
- Level the string using a line level or laser, adjusting until it reads perfectly horizontal.
- Measure the vertical distance from the string down to the ground at the low point. That gap tells you your current natural grade.
- Calculate your target drop: multiply the run in feet by 0.25 inch (or 0.125 for the minimum grade).
- Set your forms or screed rails to hit that calculated drop, not to “look about right.”
For a new pour, this string line work happens before concrete arrives. Forms locked to the correct grade are what actually create slope. No amount of skillful floating or troweling afterward will fix a form that was set flat, because finishing techniques shape the surface texture, not the underlying grade. Check your string and forms more than once during setup, since a bumped stake can throw off the whole calculation.
Pro Tip: Run a hose test before you backfill or seal anything. Flood the high end and watch where the water actually goes. It’s a five-minute check that catches mistakes while they’re still cheap to fix.
If you’re checking an existing patio rather than building new, take readings at the center, both edges, and the outlet point. Multiple elevation readings catch cross-slope traps that a single measurement at the house wall would miss entirely, and those traps are the most common reason a patio “should” drain but doesn’t.
Does Your Patio Material Change How Much Slope You Need?
Concrete and sealed natural stone behave as fully impervious surfaces. Every drop of rain that lands on them has to run off the top, so they need the full standard grade, 2% or 1/4 inch per foot at minimum, to avoid ponding. There’s no wiggle room here because there’s no other place for water to go.
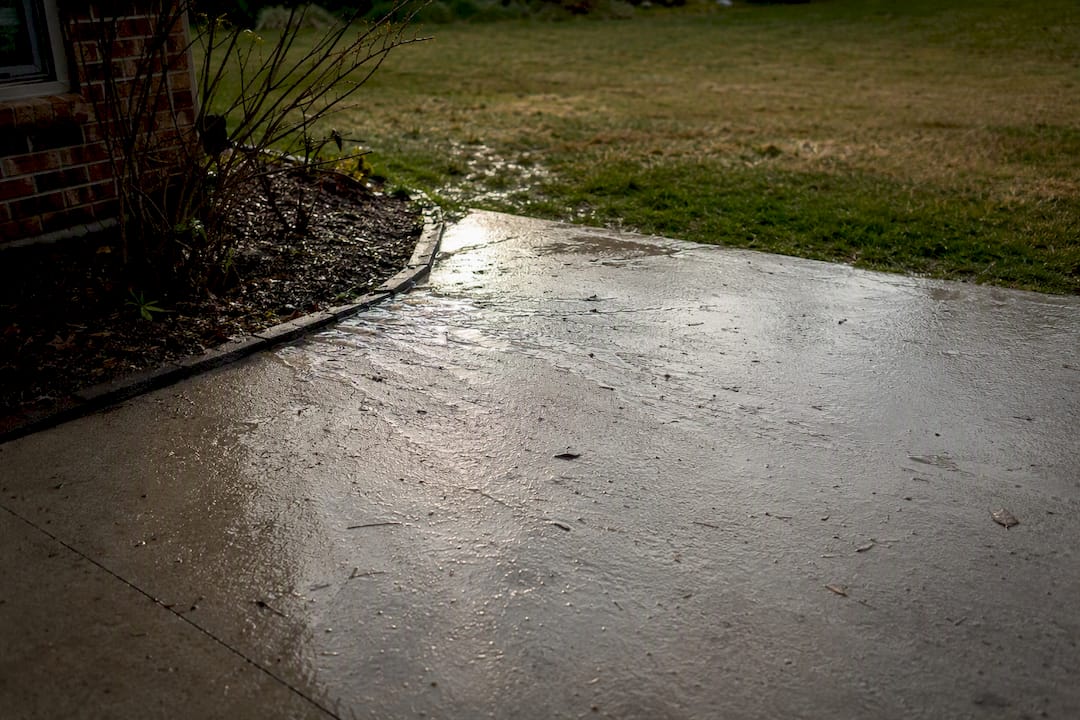
Sand-set pavers need the same surface slope as solid concrete, and that surprises a lot of people who assume the gaps between pavers will just let water soak through. They do, for a while. But polymeric sand and years of foot traffic gradually seal those joints, and a paver patio that was designed assuming joint infiltration will start holding water on the surface exactly like a solid slab would. Joints alone were never a reliable drainage strategy, which is why the surface grade still matters even on jointed pavers. If you’re weighing pavers against poured concrete for a new build, plan the same slope for either choice.
True permeable pavers are the exception. That flexibility comes with strings attached: the base has to be built to spec, and the system needs periodic maintenance, usually vacuuming or refreshing joint aggregate, to keep infiltration rates from dropping over time.
A few practical limits worth knowing:
- Slopes above roughly 3% start feeling noticeably tilted for furniture, dining tables, and anyone walking with a full tray.
- Long patios that would need a steep continuous grade to drain end to end are often better served by a channel drain partway across, breaking the run into two shorter, gentler slopes.
- Mixed-material patios (say, a concrete pad with a paver border) need the whole assembly graded as one system, not each material sloped independently.
Where Should Patio Runoff Actually Go?
Getting water off the patio surface is only half the job. Where it goes next determines whether you’ve solved the problem or just relocated it to your neighbor’s yard or your own crawl space.
Sheet flow to daylight, letting water spread naturally into a lawn or a graded swale, works fine when your yard has somewhere for it to go and enough distance from the house. This is the simplest and cheapest option, and it’s the default for a lot of straightforward backyard patios.
When sheet flow isn’t practical, because the yard is flat, small, or slopes the wrong direction, collected drainage takes over:
- Linear (channel) drains set into the patio surface at the low edge, tied to a buried pipe
- Area drains at specific low points, useful for irregular shapes
- Dry wells for sites where there’s no good place to daylight the water and infiltration on-site is the only option
- Storm sewer connections, which usually require a permit and coordination with your local jurisdiction
Roof downspouts deserve a mention here because they’re a common blind spot. A patio can be graded perfectly and still flood if a downspout dumps directly onto it or into the same low corner the patio drains toward. Route downspouts separately, or size your drainage collection to handle both sources together, before you assume the patio slope alone will handle everything.
Pro Tip: If your patio sits near a swimming pool, coordinate the outlet direction carefully. Pool drainage systems and patio runoff shouldn’t compete for the same low point, or you risk pushing extra volume toward equipment that isn’t designed for it.
Direct overflow into planting beds or a lawn area designed to absorb extra volume when you can, and always think one property line past your own. A drainage plan that stops at the patio edge isn’t really a plan. It’s a way of moving the puddle to a spot you’ll notice less often.
Fixing a Patio That Already Holds Water
Not every drainage problem needs a full teardown. The right fix depends on how bad the ponding is, how close the patio sits to your foundation, and whether the slab itself is structurally sound.
Start with the least invasive options:
- Add a linear drain at the lowest edge to intercept standing water before it spreads.
- Regrade a localized low spot with compacted base material if the dip is small and isolated.
- Install a catch basin at the worst pooling point, tied to a short run of pipe.
If those don’t solve it, move to moderate repairs:
- Bury a drain line running from the problem area out to daylight or a dry well.
- Pull up pavers, re-level the base with fresh compacted material, and reset them at the correct grade.
- Adjust threshold details where the patio meets a door, since a lot of “drainage” complaints are really a threshold sitting too low.
For patios with a fundamentally wrong grade, the fix is bigger:
- Saw-cut and remove the slab, reset forms to the correct slope, and repour.
- Consider slabjacking (mudjacking or polyurethane foam injection) to raise a sunken section back toward proper grade, where the underlying issue is settlement rather than a bad original pour.
- Converting to permeable pavers during a rebuild can reduce how much surface slope you need, provided the site and local permits allow it.
A quick way to decide DIY versus professional help: if the problem area sits within 10 feet of your foundation, involves rerouting water underground, or requires removing and repouring concrete, call a qualified contractor rather than experimenting. Foundation-adjacent drainage mistakes are expensive to get wrong twice. A localized regrade of a small low spot away from the house, on the other hand, is a reasonable weekend project for a homeowner comfortable with a compactor and a level.
Pro Tips From GC Signature Outdoors on Getting Slope Right the First Time
After years of pouring patios and correcting drainage problems across the KC Northland area, a few habits separate the patios that hold up from the ones we get called back to fix.
- Take at least four elevation readings before you trust any slope: center, left edge, right edge, and the outlet point. A single reading at the house wall misses cross-slope traps almost every time.
- Set slope in the forms, not with a trowel. Once concrete starts to set, you’re texturing a surface that already has its final grade.
- Water-test before backfilling around the edges. It’s far easier to adjust a form than to dig out landscaping you just installed.
- Keep a written or photo record of your slope verification, especially useful if a drainage dispute ever comes up with a neighbor or during a home sale.
Some projects call for a professional from the start: work within 10 feet of your foundation, patios collecting runoff from multiple sources (roof, yard, and a driveway all in one spot), full slab replacement, or anything that touches permit requirements or underground piping.
GC Signature Outdoors LLC builds paver patios and outdoor living spaces throughout Smithville, Platte City, and Kearney, alongside retaining wall drainage systems and full landscape design and construction. A properly scoped project includes a grading plan, verified slope before and after pour, and documentation you can reference later.
| What to expect from a pro | Why it matters |
|---|---|
| Written grading plan | Confirms slope direction and outlet before any digging starts |
| Multiple-point slope verification | Catches cross-slope issues a single check would miss |
| Permit coordination | Needed when tying into storm systems or working near property lines |
| Post-installation water test | Confirms the design works before landscaping goes back in |
Editorial Take: What Most Patio Guides Get Wrong About Slope
Most advice on this topic stops at the number. Slope it a quarter inch per foot, and you’re done. That’s true as far as it goes, but it skips the part that actually causes the callbacks: verification. A slab can be poured with a correctly calculated drop and still fail, because the forms shifted an inch during the pour, or because nobody checked for a cross-slope trap hiding in the middle of an otherwise correctly graded surface.
The conventional wisdom also underrates outlet planning. Homeowners fixate on getting water off the patio and stop thinking the moment it clears the edge. That’s backwards. Where the water lands matters as much as how it leaves the slab, and a lot of drainage complaints two years after installation trace back to a downspout or a neighbor’s runoff nobody accounted for during design.
If there’s one thing to prioritize first, it’s the water test. Not the calculation, not the string line, the actual test with a hose before anything gets backfilled or sealed. Numbers on paper are a starting point. Watching where the water actually goes is the only real confirmation.
— GC Signature Outdoors LLC
Get Your Patio Drainage Done Right the First Time
Getting slope right on paper is one thing. Getting it right in the ground, on a real site with real soil and an existing grade to work around, is where DIY projects and lower-end installs tend to fall apart. GC Signature Outdoors LLC builds every paver patio in Smithville, Platte City, Kearney, and the surrounding KC Northland area with verified slope from the string line through the final water test, backed by grading plans and documentation you actually get to keep.

If you’re planning a new patio or dealing with one that already ponds, our design-build team handles the grading, the outlet routing, and the construction in one project instead of coordinating separate contractors for each piece. We also build the retaining walls, swales, and drainage tie-ins that a lot of patio problems actually trace back to, so the whole system gets solved together instead of patched piece by piece. Check out our paver patio and outdoor living services and request a site visit to get a grading plan for your yard.
Primary Sources and Further Reading
These sources back the numeric standards and measurement methods covered above:
- Building America Solution Center: the 10 foot rule and positive drainage guidance
- BuildMaterialCalc: slope-to-percent conversions and drop calculations
- ConcreteNetwork: concrete-specific slope and form-setting guidance
- PavingExpert: multi-point measurement method for verifying grade
Sources
- Patio slabs, porch slabs, walkways, and driveways — slope away from house (BASC/PNNL)
- Concrete patio slope calculator: drainage pitch (BuildMaterialCalc)
- Concrete slope for exterior slabs: How to ensure proper drainage (ConcreteNetwork)
- Setout and levels for paving (PavingExpert)
FAQ
How do I stop runoff on a sloped yard?
Grade-controlled swales, channel drains, and planting beds designed to absorb overflow all help manage runoff on a sloped yard, and coordinating downspouts with your yard’s natural grade prevents concentrated flooding at a single low point.
What is the best drainage system for a patio?
For most residential patios, a 1/4 inch per foot surface slope combined with a clear outlet, whether that’s sheet flow to daylight, a swale, or a channel drain, handles water reliably; GC Signature Outdoors LLC designs each system around the specific site’s grade and outlet options rather than a one-size-fits-all solution.
Can I fix patio drainage without repouring the whole slab?
Often, yes. Adding a linear drain at the low edge, regrading a small low spot, or installing a catch basin can resolve moderate ponding without removing the existing slab, though a fundamentally wrong grade usually requires a saw-cut and repour.
Recommended
- Retaining Wall Drainage: What to Install and Why | GC Signature Outdoors
- Yard Drainage Solutions: Fixes by Symptom and When to Call a Pro | GC Signature Outdoors
- Small Backyard Patio Ideas That Maximize Every Inch | GC Signature Outdoors
- Low Maintenance Landscaping for Homeowners: A Starter Plan | GC Signature Outdoors
Ready to get started in Kansas City's Northland?
GC Signature Outdoors serves Smithville, Platte City, Kearney, Liberty, and surrounding areas.