
Homeowners: Spot Lawn Grub Damage in 5 Minutes and Know the 5–10 Rule
Homeowners: Spot Lawn Grub Damage in 5 Minutes and Know the 5–10 Rule
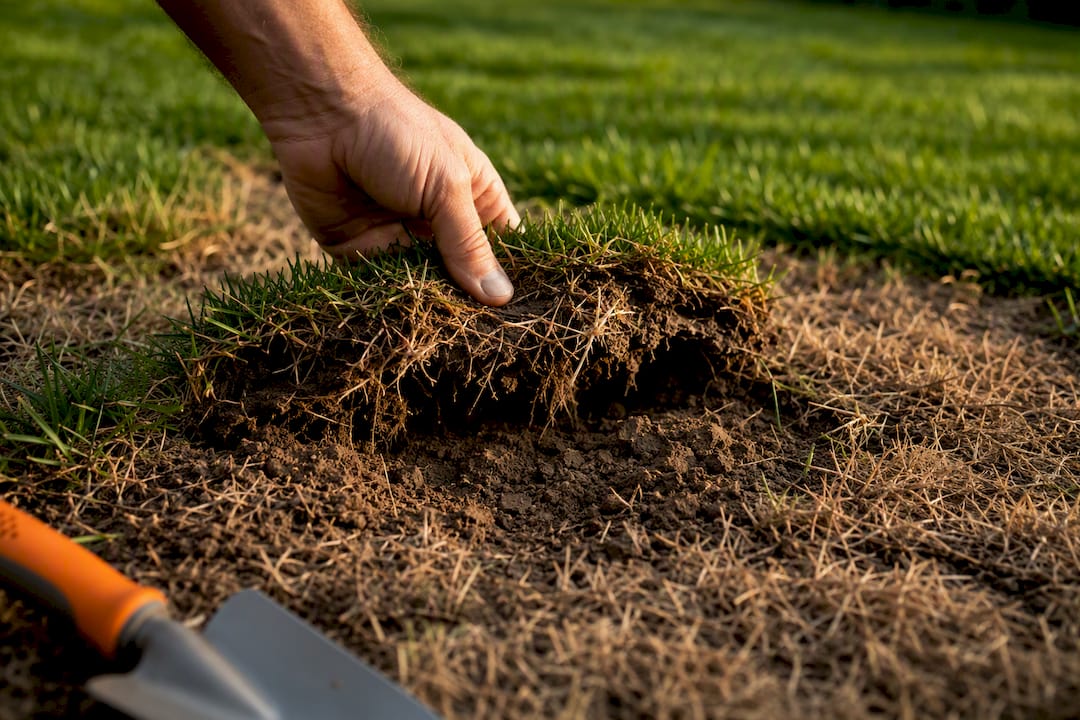
If your lawn has irregular brown patches that won’t green up, turf that peels back like carpet, or a spongy feel underfoot, grubs are a real possibility, especially if raccoons or skunks have started digging. The fastest way to confirm it is a simple sod test at the edge of a damaged patch. Grab a spade, check the top few inches of soil for C-shaped white larvae, and go from there.
TL;DR:
- Confirm grub presence with a sod test at the border of healthy and damaged turf, inspecting for C-shaped larvae in the top 2 to 3 inches of soil.
- Damage peaks from mid-August to October, with thresholds around 5 to 10 grubs per square foot, depending on species and irrigation.
- Accurate identification and sampling across multiple spots help determine whether treatment is necessary, especially before larvae grow larger.
- Lawn recovery depends on controlling grub populations and repairing damage through aeration, overseeding, or resodding, with fall being the best window for overseeding.
- Professional inspection involves deeper soil sampling, species identification, and tailored treatment plans, especially for large or widespread infestations.
Table of Contents
- Grub Damage Lawn Signs You’ll Notice First
- How to Confirm Grubs With a Sod Test
- When Grub Damage Shows Up and What Counts as Too Many
- Grub Damage vs. Drought, Disease, and Other Pests
- What to Do Right Now if You Confirm Grubs
- Preventing Grubs and Repairing the Damage
- What a Professional Grub Inspection Actually Involves
- The Real Lesson Behind Grub Damage Signs
- Ready for a Professional Grub Inspection?
- Sources
- FAQ
Grub Damage Lawn Signs You’ll Notice First
Grubs feed on grass roots just below the surface, so the aboveground symptoms tend to show up before you ever see the insects themselves. Brown or yellowing patches with ragged, irregular edges are the first tip-off, especially when watering doesn’t bring them back to life. That’s different from a sprinkler gap, which usually leaves a clean, consistent shape.
Turf that peels up like a loose carpet is one of the more dramatic signs of grub damage, and it means the root system underneath has been chewed through. A spongy feel when you walk across the lawn, or footprints that stay pressed in instead of springing back, points to the same root loss.
- Brown or yellow patches that don’t respond to watering
- Turf that lifts or rolls back with minimal tugging
- Springy, mushy footfeel where healthy turf usually resists
- Fresh digging from skunks, raccoons, or birds hunting grubs near the surface
For a lot of species, damage becomes obvious mid-August through October, when larvae are at their largest and eating the most.
How to Confirm Grubs With a Sod Test
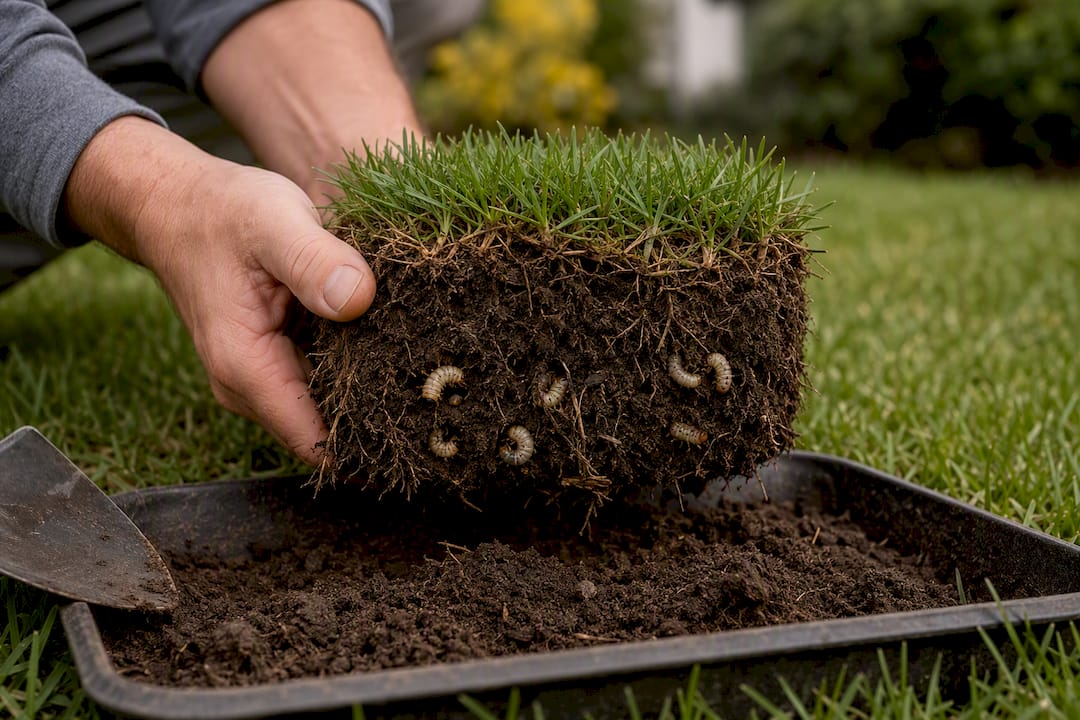
Before you spend money on treatment, confirm what’s actually causing the damage. A five-minute inspection at the edge of a brown patch will tell you more than guessing ever will.
What you’ll need: a garden spade, a pair of gloves, and something to kneel on if your knees appreciate that sort of thing.
- Pick a spot right at the border between healthy and damaged turf, not deep in the dead zone.
- Cut three sides of a 1-foot square with your spade, leaving one side attached like a hinge.
- Fold the sod back and inspect the top 2 to 3 inches of soil for C-shaped white larvae.
- Count what you find, then press the sod back down and water it to help it reestablish.
- Repeat at 6 to 10 spots in a zigzag pattern across both damaged and adjacent healthy-looking areas, since grubs cluster unevenly.
Add up the total grub count and divide by the number of squares checked to get an average grubs-per-square-foot number. That figure helps assess whether the population is below or above typical treatment thresholds.
Pro Tip: Keep a simple notebook or phone note with the date, location, and grub count for each sample. If you check again in two weeks, you’ll know whether the population is growing or holding steady, which matters more than a single snapshot.
When Grub Damage Shows Up and What Counts as Too Many
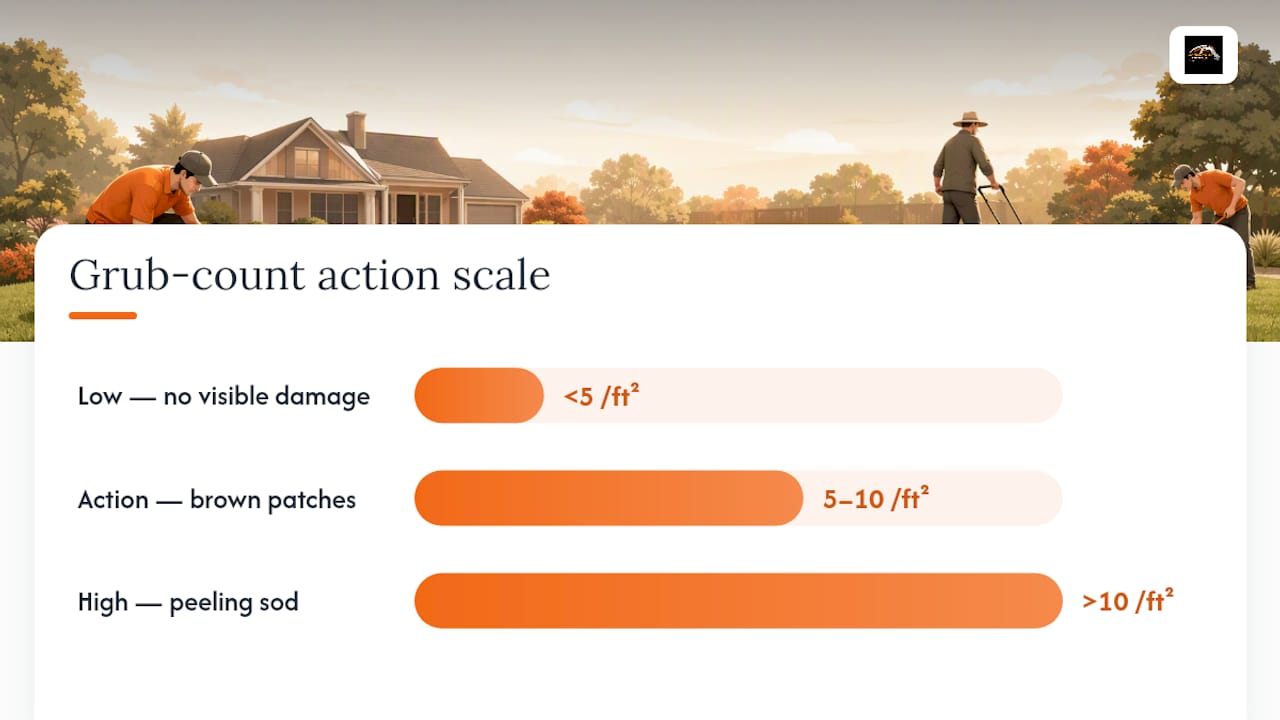
Timing matters almost as much as the count. Larvae hatch in early summer, then grow steadily through the season, which is why visible damage peaks between mid-August and October for many species.
Extension guidance commonly points to a treatment threshold of about 5 to 10 grubs per square foot, but thresholds vary by species and irrigation status:
- Japanese and Oriental beetle larvae: threshold closer to 6 to 12 per square foot
- May and June beetle larvae: threshold closer to 3 to 5 per square foot
- Irrigated lawns tolerate roughly 30% more grubs than unirrigated turf before damage becomes visible
Healthy, well irrigated turf can shrug off a higher grub count simply because its root system has more reserve capacity. Sampling in August, before damage peaks, gives you a real window to treat while larvae are small and easier to knock down.
Grub Damage vs. Drought, Disease, and Other Pests
Not every brown patch is a grub problem, and treating for grubs when the real issue is water stress wastes time and money. The quickest differentiator is whether the turf stays anchored to the ground.
- Drought stress: Grass stays rooted, footprints may linger, and stress patterns look uniform across sun-exposed areas. Deep, infrequent watering usually brings it back.
- Fungal disease or fertilizer burn: Look for lesions or discoloration on individual blades, patterns that follow application swaths, and timing right after a feeding or a wet stretch.
- Billbugs, chinch bugs, or sod webworms: These show up with different clues, like sawdust-like frass at the crown, chewed blade tips, or thin trails through the thatch, and each has its own confirmation test.
Integrated pest management guidance recommends ruling out irrigation, fertilization, and soil health issues before assuming grubs are to blame. When the sod test is inconclusive, a professional diagnosis beats a guess.
What to Do Right Now if You Confirm Grubs
Once you’ve counted grubs above the threshold for your species and irrigation setup, it’s time to act, not panic. Map out where the damage and grub counts are worst so any treatment goes exactly where it’s needed instead of blanketing the whole yard.
- Sample a few more spots to confirm the infestation isn’t isolated to one corner
- Decide DIY versus professional treatment based on the size of the affected area
- Treat curatively in late summer through early fall when larvae are actively feeding near the surface
- Apply preventatively in early summer if your lawn has a history of grub pressure
Biological options like beneficial nematodes (Heterorhabditis bacteriophora) or Bacillus thuringiensis galleriae can work well, but nematodes need to stay moist for 48 hours after application to survive. Common homeowner insecticides include imidacloprid, chlorantraniliprole, and trichlorfon, and extension guidance recommends spot-treating damaged zones rather than spraying the entire lawn when the problem is localized.
Pro Tip: Always water in granular grub control products according to the label. Grubs feed below the surface, and a dry application just sits on top of the thatch doing nothing.
Preventing Grubs and Repairing the Damage
Cultural habits do more heavy lifting than most homeowners expect. Proper irrigation, mowing at the right height for your grass type, and managing thatch buildup all make your lawn less appealing to egg-laying beetles in the first place.
- Water deeply and infrequently rather than daily light sprinkles
- Keep mowing height appropriate for your grass species to encourage deeper roots
- Reduce thick thatch layers where beetles prefer to lay eggs
- Consider an annual preventive treatment if your lawn has a documented history of grub damage or represents a high-value investment
Once grubs are under control, repair follows a set order: treat first, then aerate and overseed or lay new sod over the worst areas, then follow with appropriate fertilization to help roots rebuild. Fall is typically the best window for overseeding cool-season grasses, since soil temperatures still support germination without summer heat stress.
What a Professional Grub Inspection Actually Involves
A homeowner sod test tells you a lot, but a professional inspection goes deeper, literally. Technicians pull more soil cores across a wider grid, identify the exact species causing damage, and map out how far the infestation has spread before recommending a plan.
- Multiple deep-core samples instead of a handful of spot checks
- Species identification to set the right treatment threshold
- A treatment plan that pairs curative or preventive product with aeration and overseeding
- Follow-up visits to confirm the population dropped and turf is recovering
| What homeowners get from DIY | What a professional adds |
|---|---|
| Basic sod test at a few spots | Wider grid of deeper soil cores |
| General grub count | Species-specific identification |
| Guesswork on treatment timing | Treatment mapped to species life cycle |
| One-time fix | Follow-up check and repair plan |
Large or rapidly spreading patches, limited time, or hesitation around handling insecticides are all good reasons to bring in a pro rather than working through it alone.
The Real Lesson Behind Grub Damage Signs
Most homeowners treat grub damage like a mystery when it’s usually a math problem. The signs, brown patches, spongy turf, peeling sod, are consistent enough that a five-minute spade test tells you more than an hour of searching forums. The conventional advice oversells the guesswork and undersells the sampling.
Where a lot of guidance falls short is timing. Homeowners tend to wait until the lawn looks bad before checking, but by then larvae are larger, harder to kill, and the damage is already locked in. Sampling in August, before the worst symptoms show, gives you leverage you lose by October.
Prioritize this: confirm before you treat, sample more than one spot, and match your response to the actual count instead of a hunch. A lawn with 4 grubs per square foot and good irrigation doesn’t need the same response as one with 12 grubs and thin, stressed turf. Treat the number, not the fear.
— GC Signature Outdoors LLC
Ready for a Professional Grub Inspection?
If the sod test turns up grubs above your threshold, or you’d rather skip the digging altogether, GC Signature Outdoors LLC handles the whole process for homeowners across the KC Northland area, from Smithville to Platte City to Kearney. That means a real inspection instead of a guess, targeted treatment instead of a blanket spray, and a repair plan that gets your lawn back to full health rather than just patching the surface.

Booking a visit gets you a proper inspection, an honest read on grub counts and species, and a clear estimate for treatment plus any aeration or overseeding your lawn needs afterward. Everything gets handled by one team, so you’re not juggling separate calls for treatment and repair. Check out GC Signature Outdoors’ lawn care services to schedule an inspection and get a plan built around what your yard actually needs.
Sources
- Dealing with Grubs in Lawns | Lawns | Illinois Extension | Illinois
- White grubs | West Virginia University Extension
- University of California Agriculture and Natural Resources guidance
FAQ
Will a lawn recover from grub damage?
Yes, most lawns recover once the grub population is controlled and the damaged areas are aerated and overseeded or resodded, though root recovery can take several weeks depending on the extent of the damage.
How do I know if grubs are killing my lawn?
Look for irregular brown patches that don’t respond to watering, turf that lifts up like carpet, a spongy feel underfoot, and fresh digging from animals hunting the larvae; confirm with a sod test before treating.
What will kill grubs in your lawn?
Common options include beneficial nematodes, Bacillus thuringiensis galleriae, and insecticides like imidacloprid, chlorantraniliprole, or trichlorfon, applied and watered in according to the product label.
Will grubs eventually go away?
Grub populations naturally cycle as larvae mature into beetles and leave the soil, but they typically return the following season unless you address the conditions that attracted egg-laying beetles in the first place.
When should I apply grub control?
Preventive treatments work best in early summer before eggs hatch, while curative treatments are most effective in late summer through early fall when larvae are actively feeding near the surface.
Recommended
Ready to get started in Kansas City's Northland?
GC Signature Outdoors serves Smithville, Platte City, Kearney, Liberty, and surrounding areas.