
Drainage First Rules for KC Homeowners Installing Pavers Over Concrete
- Installed per sq ft
- $18–$35
- Typical 400 sq ft patio (with fire pit)
- $9,000–$14,000
Drainage First Rules for KC Homeowners Installing Pavers Over Concrete
Yes, pavers can go directly over an existing concrete slab, but only if that slab is structurally sound and slopes away from your house rather than toward it. Cracks under 1/8 inch and minor surface wear are fine. Active movement, standing water, or a slab pitched the wrong way means you overlay problems into your new patio, not solve them. Sand-set, dry mudset, and adhesive-bonded methods each fix different slab conditions.
TL;DR:
- Overlaying pavers works best on a structurally sound and minimally cracked slab that slopes away from the house and drains properly.
- Cracks under 1/8 inch, minor surface wear, and a stable concrete sound indicate suitability, while active cracks or slab movement are red flags.
- Proper drainage involves drilling holes in low spots and using perimeter drains; improper slope toward the house can cause failures despite drainage efforts.
- Sand-set, mortar-set, and bituminous methods suit different slab conditions and intended traffic loads, with each requiring specific preparation and installation techniques.
- DIY is feasible for small, level patios, but larger slabs, serious drainage, or structural issues call for professional inspection and installation.
Table of Contents
- When Does It Make Sense to Overlay Pavers on Concrete?
- How Do You Check If Your Concrete Slab Is Ready for Pavers?
- Why Drainage Determines Whether Your Overlay Lasts
- Which Installation Method Should You Use: Sand, Mortar, or Bituminous?
- The Step-by-Step Process for Installing Pavers on Concrete
- What Materials and Tools Do You Actually Need?
- How Much Extra Height Will Pavers Add to Your Patio or Walkway?
- How Do You Maintain Pavers Installed Over Concrete?
- When Should You Replace the Concrete Instead of Overlaying It?
- Our Take: When to DIY and When to Call In a Pro
- Get a Professional Slab Inspection Before You Commit
- Sources
- FAQ
When Does It Make Sense to Overlay Pavers on Concrete?
Overlaying pavers over existing concrete works best when the slab is doing its job structurally and just looks tired. If the surface has scaling, staining, minor spider cracks, or an outdated color but the concrete itself hasn’t shifted, you’ve got a good candidate for an overlay instead of a full tear-out.
Here’s what tells you the slab is a good foundation to build on:
- The slab sits mostly level with no sections higher or lower than 1/4 inch from each other
- Existing cracks are hairline or under 1/8 inch wide and haven’t grown
- Water drains away from the house rather than pooling near the foundation
- The concrete sounds solid when tapped, not hollow or crumbly
Red flags that should stop you before you buy a single paver: active cracks still widening season to season, sections heaving up from frost or tree roots, crumbling edges you can scrape away with a screwdriver, or a slope that channels water toward your foundation instead of away from it.
Application matters too. A patio or walkway that only sees foot traffic has a lot more forgiveness than a driveway carrying vehicle loads. If you’re overlaying a driveway, the slab’s load history and any signs of settling matter far more than they do for a backyard sitting area.
How Do You Check If Your Concrete Slab Is Ready for Pavers?
Before you commit to installing pavers on concrete, run this inspection yourself. It takes under an hour and tells you almost everything you need to know.
- Check the slope. Set a 4 foot level on the surface and measure the gap at the low end with a tape measure. You’re looking for roughly a 1/4 inch per foot slope, which works out to about a 2% grade, moving water away from the house rather than toward it.
- Sound out hollow spots. Tap across the slab with a hammer or a length of rebar. A solid, sharp knock means good bonding underneath. A dull, hollow thud signals a void or delaminated layer that will eventually cave or crack under paver weight.
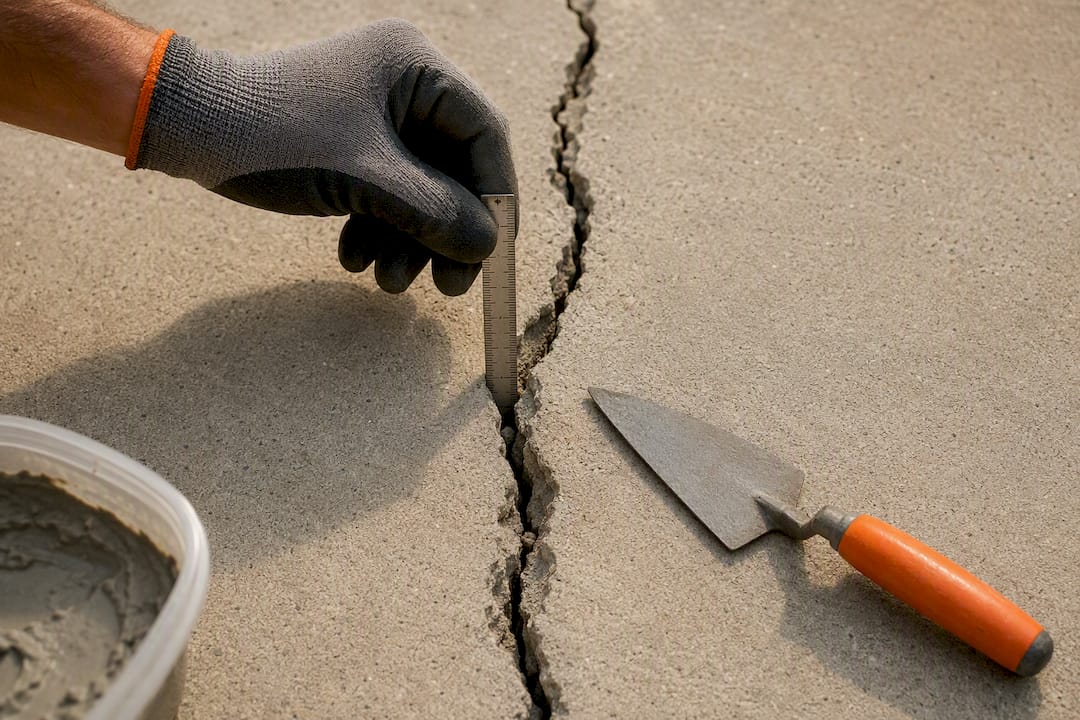
- Measure every crack you find. Anything under 1/8 inch is cosmetic. Cracks between 1/8 and 1/4 inch need patching before you proceed. Anything wider, especially if it’s stepped or offset, points to a foundation issue worth a second opinion.
- Run a hose test. Wet the whole slab and watch where water sits for more than a few minutes. Mark those spots with chalk. They’ll need extra attention during bedding prep or drainage work.
- Call a professional if you see structural movement. Heaving, stepped cracks, or a slab pulling away from the foundation wall isn’t a weekend fix. Get a structural opinion before spending money on materials.
Pro Tip: Do the hose test on a sunny afternoon after the slab has had a chance to dry once. Pooling that shows up on already-wet concrete is a lot easier to spot against a dry, chalk-dusty surface.
Cracks wider than 1/8 inch should get filled with a polymer-modified patching compound before anything else goes down.
Why Drainage Determines Whether Your Overlay Lasts
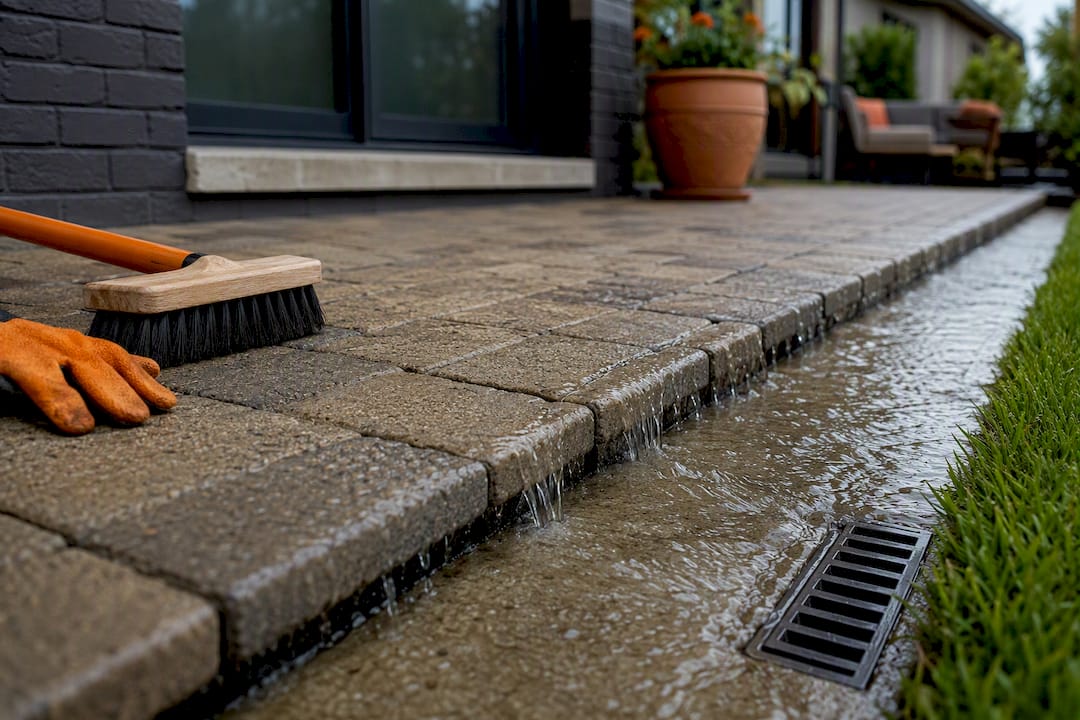
Concrete is essentially waterproof. That’s exactly the problem once you put pavers on top of it. Rain and irrigation water that seeps between paver joints has nowhere to go except sideways, and if it can’t escape, it sits against the slab and starts working against your investment.
Trapped moisture causes three predictable failure modes over time:
- Joint sand washout, where water movement under the pavers slowly carries bedding sand out through the joints, leaving pavers loose and rocking
- Efflorescence, the white chalky mineral deposits that bloom on paver surfaces as trapped water evaporates and leaves salts behind
- Frost heave, where trapped water freezes, expands, and pushes pavers out of alignment during winter freeze-thaw cycles
Contractors typically address this by drilling drainage holes through the slab at every low spot the hose test identified, spacing them so each one sits under a paver joint rather than under a solid paver where it would be useless. A French drain or edge drain along the perimeter handles water that collects at the border, and for slabs with more than one persistent low area, regrading the bedding layer during installation solves the problem permanently rather than patching around it.
If the slab’s slope is fundamentally wrong, meaning it channels water toward the house rather than away from it, no amount of drilling fixes that. That’s a replacement situation, not an overlay one.
Which Installation Method Should You Use: Sand, Mortar, or Bituminous?
Three overlay methods dominate the industry, and picking the wrong one for your situation is the single most common overlay mistake homeowners make.
Sand-set installation uses roughly a 1 inch bedding layer of coarse sand between the concrete and the pavers. It’s the most forgiving option because the sand layer flexes slightly with minor slab movement instead of transferring stress directly into the pavers. This makes it the go-to choice for pedestrian patios and walkways, especially on slabs with a little bit of settling history. The tradeoff is that sand-set assemblies need more attention to edge restraint, since nothing is bonding the pavers to the concrete below.
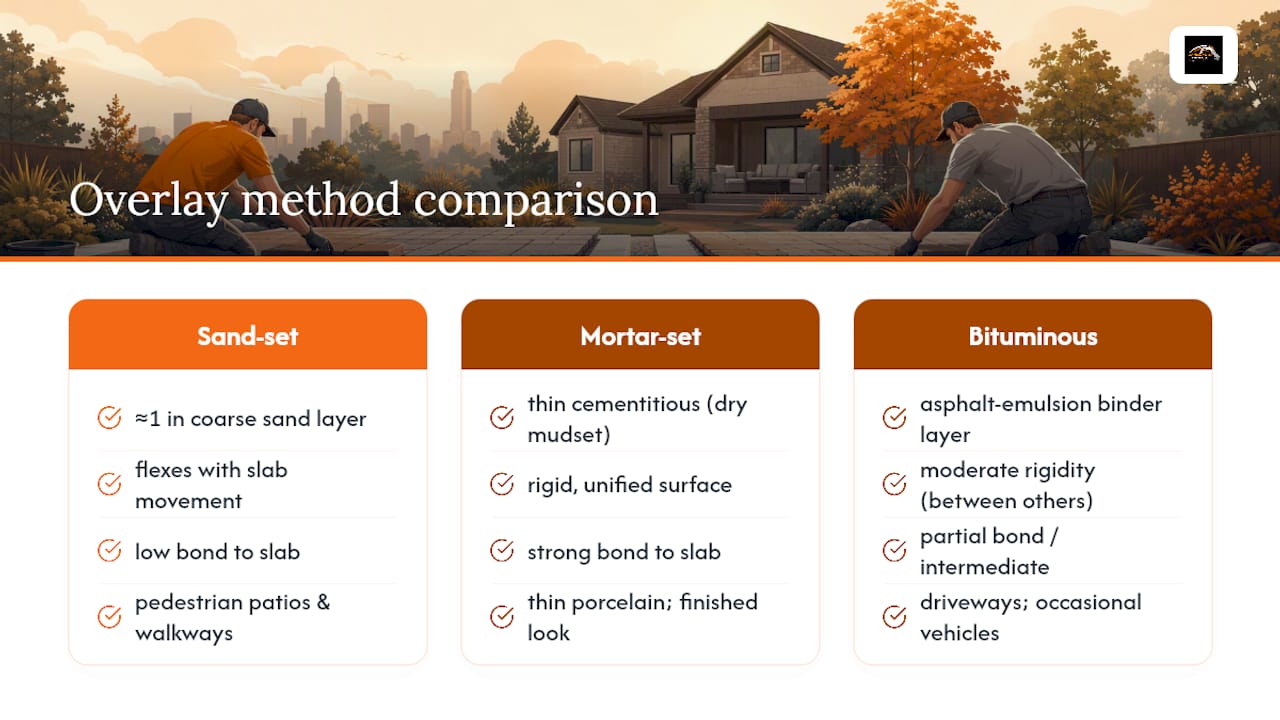
Dry mudset, or mortar-set installation, bonds pavers directly to the slab using a thin cementitious layer. This method creates a rigid, unified surface that’s ideal for thin porcelain pavers and any application where you want a tighter, more finished look. It bonds fast and can even bridge minor surface cracking in the slab underneath. The catch: a bonded assembly is far less tolerant of slab movement after the fact. If the concrete shifts even slightly down the road, a mortar-set installation is more likely to crack than a sand-set one is to shift.
Bituminous, or asphalt-emulsion binder, installation sits between the two. It’s used less often residentially but comes up for driveways and occasional-vehicle applications where you need more rigidity than sand-set offers without the full commitment of a mortar bond.
Climate matters here too. In freeze-thaw regions, manufacturer guidance consistently favors methods that allow at least some drainage path rather than a fully sealed bond, since trapped water under a rigid assembly has fewer places to go when it freezes.
The Step-by-Step Process for Installing Pavers on Concrete
Whether you’re doing this yourself or checking a contractor’s work, this is the sequence that actually holds up.
- Pressure wash the entire slab and let it dry fully, typically 24 to 48 hours depending on humidity. Strip any sealers, paint, or coatings that would prevent bedding material or adhesive from bonding properly.
- Repair every crack over 1/8 inch with a polymer-modified patching compound, and grind down any high spots or ridges with a concrete grinder so the surface is even.
- Screed your bedding layer. For sand-set, that’s roughly 1 inch of coarse sand leveled with a screed board. For mudset, mix and spread a thin mortar layer to the manufacturer’s recommended depth, usually a fraction of an inch, working in small sections so it doesn’t set up before you place pavers.
- Lay the pavers, starting from a corner or a fixed reference line, cutting edge pieces with a wet saw as you go. Keep joint spacing consistent throughout.
- Compact the surface with a plate compactor fitted with a protective pad, which seats the pavers into the bedding layer without chipping the surface.
- Fill the joints with polymeric sand for sand-set installations or the manufacturer’s specified mortar for mudset, then seal if you want extra protection against staining and sand washout.
- Install edge restraint around the entire perimeter before you finish, and double-check every transition point where the new paver surface meets a door threshold, step, or existing walkway.
Pro Tip: Dry-lay a small test section with no bedding material first, just to confirm your cut pieces and pattern layout before you mix a single batch of mortar or screed any sand. Fixing a layout mistake before installation takes minutes. Fixing it after is a demolition project.
What Materials and Tools Do You Actually Need?
The paver design options available for concrete overlays go well beyond traditional concrete pavers, and the material you choose drives which bedding system makes sense.
Thin porcelain pavers, typically around 20mm thick, have become one of the best pavers for concrete overlays because their low profile minimizes added height and they resist staining, frost damage, and fading far better than natural stone. Porcelain requires a bonded installation, and manufacturers specifically call for adhesives engineered for exterior use, such as Laticrete 254 Platinum, rather than a generic thinset.
For bedding, coarse sand at roughly 1 inch depth handles sand-set jobs, while polymeric sand fills the joints afterward and hardens slightly when activated with water, locking pavers in place and resisting weed growth. Dry mudset products, sold as pre-blended bagged mixes, activate with water on-site and bond in a way that behaves like a thin layer of concrete once cured.
Your tool list for a weekend overlay project:
- Plate compactor with a protective pad
- Pressure washer
- Angle grinder for smoothing high spots
- Wet saw for cutting pavers to fit edges
- Hammer drill, if you’re drilling drainage holes through the slab
For edge restraint, options range from aluminum or PVC edging to poured concrete curbs, and mortar-set borders sometimes get reinforced with a product like BorderBond to keep the perimeter from cracking loose under thermal movement.
How Much Extra Height Will Pavers Add to Your Patio or Walkway?
Every overlay adds finished height, and skipping this calculation is how homeowners end up with a door that won’t close or a step that’s suddenly a trip hazard.
A typical sand-set installation with standard pavers adds around 1 inch or more once you account for bedding depth plus paver thickness. Thin porcelain pavers on a mortar bed add less, often closer to an inch total once mortar thickness is factored in, which is part of why they’ve become popular for tight thresholds.
Before you start, check these clearances:
- Door swing and threshold height. Measure from the current slab up to the bottom of every exterior door that opens onto the surface you’re overlaying.
- Steps leading to the patio. A raised patio surface shortens the rise on your bottom step, which can create an unexpected trip point.
- Damp-proof course clearance. Keep the finished paver surface at least a couple of inches below any damp-proof barrier in the exterior wall, since burying it defeats its purpose and invites moisture into the structure.
If height is tight, thinner porcelain pavers, a gentle ramp transition, or slightly lowering an adjacent walkway section are all workable fixes.
How Do You Maintain Pavers Installed Over Concrete?
A well-prepared overlay commonly lasts 10 to 15 years or more, but that lifespan depends on a little upkeep, not none at all.
- Reseal joints every 2 to 3 years with a joint-stabilizing sealer, which cuts down on sand washout and resists staining, though deicing salts in colder climates still warrant extra caution around joints each winter.
- Top off washed-out joints with fresh polymeric sand as soon as you notice gaps forming, rather than waiting for a full season of erosion.
- Reset any loose or rocking pavers by lifting them, adding a bit of bedding sand underneath, and reseating them level with their neighbors.
- Walk the perimeter each spring to check that edge restraints are still solid and that drainage holes or edge drains haven’t clogged with debris.
Pro Tip: Keep a small bag of matching polymeric sand from your original installation. Color-matched touch-ups look intentional. Mismatched patch jobs look like exactly what they are.
When Should You Replace the Concrete Instead of Overlaying It?
Some slabs simply aren’t worth building on top of, and recognizing that early saves you from redoing the work twice.
- The slab shows active movement year over year, with cracks that keep widening rather than staying stable
- Cracks are wide, stepped, or offset, suggesting a settling or heave problem below the surface rather than surface wear
- Large sections crumble or spall when scraped, indicating the concrete itself has lost structural integrity
- The slope channels water toward your foundation instead of away from it, and regrading the overlay bedding can’t fully correct that
- It’s a heavy-use driveway on a base that’s already showing signs of instability, where vehicle loads will accelerate any existing weakness
The trade-off comes down to risk versus cost. An overlay on a marginal slab might look great for a year or two and then fail as the underlying problems resurface. Full replacement costs more upfront but resets the clock on all of it, giving you a stable base with no inherited issues.
Our Take: When to DIY and When to Call In a Pro
Most homeowners can handle a straightforward sand-set overlay on a small, level patio with no drainage complications. The inspection steps in this guide, slope check, hollow-spot test, crack measurement, are genuinely DIY-friendly, and a weekend of careful prep work will get a modest walkway or patio done right.
Where we’d tell a homeowner to bring in a professional: any slab larger than a couple hundred square feet, any slope correction beyond minor regrading, anything showing active structural movement, or any project where drainage problems require drilled holes and edge drains engineered to actually work together rather than guessed at.
GC Signature Outdoors LLC approaches every overlay project as a slab inspection first, hardscape installation second. That sequencing matters. A family-run crew using professional-grade compaction and cutting equipment catches slope and drainage issues before they become paver problems, not after. Expect a real inspection, a documented drainage plan, correct edge restraint for your chosen method, and a finished surface built to hold up through Missouri’s freeze-thaw cycles.
— GC Signature Outdoors LLC
Get a Professional Slab Inspection Before You Commit
Here’s the thing about overlay projects: the hardest part isn’t laying the pavers, it’s knowing whether your slab deserves them in the first place. Get that wrong and you’re redoing the job in three years. GC Signature Outdoors LLC starts every paver project in the KC Northland area with a real slab evaluation, checking slope, crack severity, and drainage before recommending overlay or replacement, so you’re not guessing at the most expensive part of the decision.

Beyond the inspection, our crew handles the full build: paver patios, concrete flatwork, drainage corrections, and the transition details that keep a new surface from creating trip hazards at your doorways. We use the same professional-grade compaction and cutting equipment referenced throughout this guide, on every job, every time.
If you’re in Smithville, Platte City, Kearney, or the surrounding Northland communities and want a straight answer on whether your concrete is a good overlay candidate, request a paver patio and outdoor living consultation and we’ll walk your slab with you before you spend a dollar on materials.
Sources
These manufacturer and industry references back the technical claims in this guide:
- Installing Pavers Over Concrete — Unilock
- Ultimate Guide to Laying Pavers Over Concrete — Belgard
- Can You Install Pavers Over Concrete Without Removing the Existing Patio? — Nicolock
- Installing Pavers Over Existing Concrete: Evaluation and Step-by-Step Methods — Build-Construct
FAQ
What Is the Cheapest Way to Cover a Concrete Patio?
A sand-set paver overlay is typically the most budget-friendly option since it skips the demolition and hauling costs of full concrete removal, though material and labor costs still vary by project size and paver choice.
What Is the Best Way to Adhere Pavers to Concrete?
For bonded installations, especially with thin porcelain pavers, manufacturers recommend an exterior-rated adhesive like Laticrete 254 Platinum rather than a standard thinset, since it’s engineered to handle outdoor temperature swings and moisture exposure.
Can You Lay Paving Slabs Straight Onto Concrete?
Yes, as long as the slab passes a basic inspection for cracks, hollow spots, and slope, you can lay pavers directly on existing concrete using sand-set, mortar-set, or bituminous methods depending on the paver type and intended use.
Do Pavers Need Concrete Underneath?
No, pavers don’t require a concrete base; that’s exactly what makes overlaying existing concrete a shortcut, since the slab itself serves as the stable foundation that would otherwise need to be poured and cured before installation.
Recommended
Ready to get started in Kansas City's Northland?
GC Signature Outdoors serves Smithville, Platte City, Kearney, Liberty, and surrounding areas.