
Paver Edge Restraint: What Every Homeowner Must Know
- Installed per sq ft
- $18–$35
- Typical 400 sq ft patio (with fire pit)
- $9,000–$14,000
Paver Edge Restraint: What Every Homeowner Must Know
Every exposed paver edge needs a structural paver edge restraint — without one, even a perfectly built base will eventually let pavers creep outward, joints widen, and the whole surface shift. The Concrete Masonry & Hardscapes Association (CMHA) is direct on this: restraints are required along all exposed perimeters of interlocking concrete pavements, not optional. Here’s the quick version of what to use:
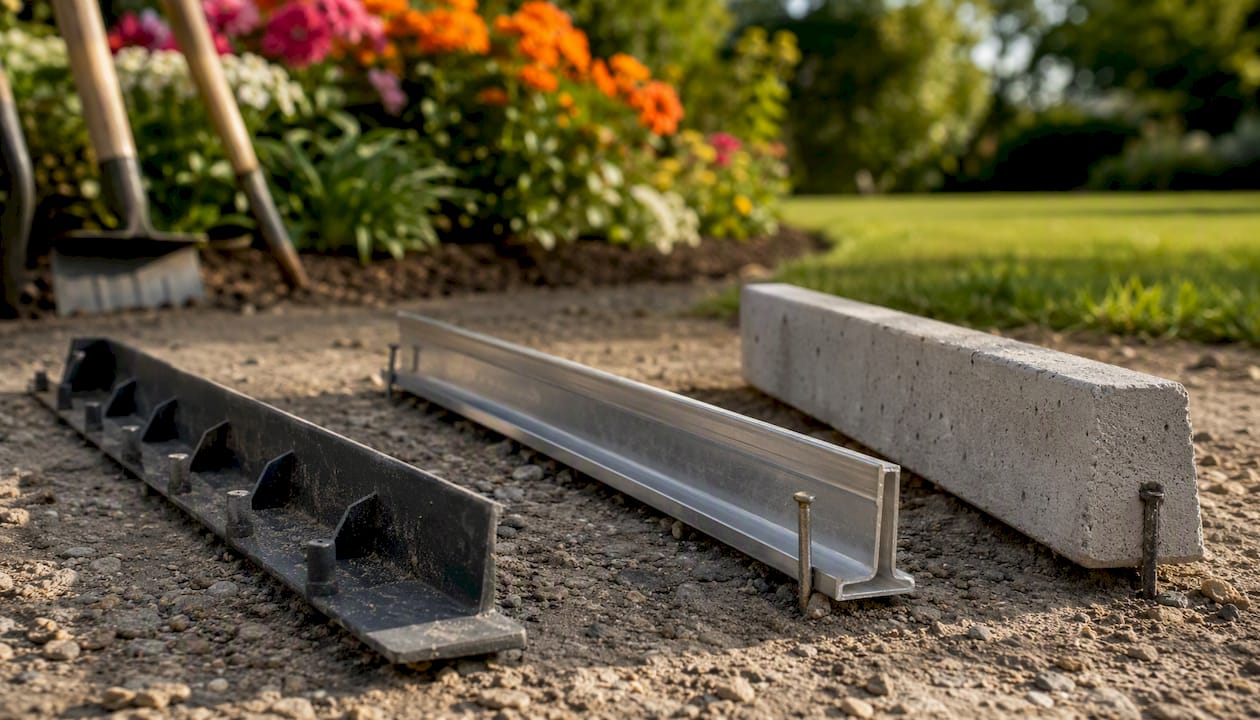
- Residential patios and curved walkways: Plastic snap-edge strips (Snap Edge, ProFlex) are the right call — affordable, flexible, and DIY-friendly.
- Straight runs with heavier foot traffic or vehicle access: Aluminum or hybrid aluminum edging with wide stakes holds lateral movement better than standard plastic.
- Driveways and high-load areas: Poured-in-place or precast concrete curbs are the most rigid option and the standard for vehicle loads.
GC Signature Outdoors LLC installs all three types across Smithville, Platte City, and Kearney — so the guidance below reflects real-world contractor practice alongside CMHA standards and manufacturer specs from Snap Edge/SEK.
Key Takeaways
A paver edge restraint is a structural requirement on every exposed paver edge — match the material to your load, anchor it into the compacted base, and extend that base past the spikes.
| Point | Details |
|---|---|
| Restraint is structural, not decorative | CMHA requires edge restraints on all exposed interlocking paver perimeters. |
| Match material to load | Plastic for light pedestrian use; aluminum/hybrid for heavy traffic; concrete for vehicles. |
| Never install on bedding sand | Spikes must anchor into the compacted aggregate base, not the sand setting bed. |
| Extend the base past the spikes | The compacted base should extend beyond the spike line by at least the base thickness. |
| GC Signature Outdoors LLC | Handles full paver installs with proper edge restraint in Smithville, Platte City, and Kearney. |
Table of Contents
- What types of paver edge restraints are available?
- How do you choose the right edge restraint for your project?
- How to install a paver edge restraint step by step
- Tools and materials you’ll need before you start
- What do industry standards say about edge restraint installation?
- Common mistakes that cause edge restraints to fail
- When should you DIY vs. hire a professional?
- GC Signature Outdoors LLC handles the hard parts of paver installation
- Sources
- FAQ
What types of paver edge restraints are available?
Matching the restraint to the job starts with understanding what each material actually does under load.
Plastic and snap-edge strips
Flexible plastic strips, sold under names like Snap Edge (distributed through Mutual Materials) and ProFlex paver edging (available at Home Depot), are the most common choice for residential patios and walkways. They flex around curves without cutting, install quickly with 10-inch spikes driven into the compacted base, and cost less than metal options. The tradeoff: they can’t handle vehicle loads, and cheap versions not designed specifically for pavers will fail faster.
- Pros: Flexible for curves, low cost, widely available, fast DIY install
- Cons: Not rated for vehicle loads, UV degradation over time, spike pullout in soft soils
Metal restraints (aluminum, steel, hybrid)
Aluminum edging is stiffer than plastic and holds a cleaner line on straight runs. Hybrid aluminum systems, like the Quick-E edging from Pave Tool, pair a rigid aluminum face with wide, flat stakes that capture more base material — which is why contractors reach for them on heavy-use residential projects. Steel is durable but can corrode if mixed with aluminum fasteners (galvanic corrosion is a real concern). According to EZG Manufacturing’s contractor guidance, hybrid aluminum with wide stakes provides superior resistance to lateral movement for heavy-duty applications.
- Pros: High rigidity, long lifespan, excellent for straight runs, handles heavier loads
- Cons: Less flexible for curves, higher cost, galvanic corrosion risk if metals are mixed
Poured-in-place and precast concrete
A concrete curb poured directly against the paver edge is the most rigid paver restraint system available. Precast concrete edging units work similarly. Both are standard for driveways and any area where vehicles turn or brake. They require more labor and can’t be adjusted once set, but they won’t pull out of the ground. For technical details on joint placement in concrete work, the concrete control joints guide covers relevant specifics.
- Pros: Maximum rigidity, no spike pullout, ideal for vehicle loads
- Cons: Permanent, labor-intensive, requires forming or precast units
Stone and edge pavers
A row of larger edge pavers or natural stone set on a properly compacted base can double as both restraint and finish detail. The catch: they must be founded on the same compacted base as the field pavers, not just set on bedding sand, or they’ll shift just as fast as an unrestrained edge.
- Pros: Attractive finish, no visible hardware
- Cons: Must be properly founded, can shift if base prep is inadequate
How do you choose the right edge restraint for your project?
Run through this checklist before buying anything:
- Traffic type: Pedestrian only, or will vehicles park, turn, or drive over the edge? Vehicles require concrete or hybrid aluminum minimum.
- Run geometry: Curved paths need flexible plastic. Long straight edges work well with aluminum or hybrid.
- Base type: Flexible (compacted aggregate) or rigid (existing concrete slab)? Rigid bases require drill-and-anchor fastening, not spikes.
- Climate: Kansas City’s freeze-thaw cycles put real stress on spike connections. Wider stakes and proper base extension reduce pullout risk.
- Adjacent structures: If a paver edge butts against a house foundation, existing concrete, or a retaining wall, that structure can serve as the restraint on that side — no separate edging needed there.
As Polycor’s professional guidance frames it: plastic for affordability and curves, aluminum or concrete systems where rigidity and long-term structural integrity are required. That’s the short version of the decision.
Best-for summary:
- Patio (curved, pedestrian): Plastic snap edge — Snap Edge or ProFlex
- Walkway (straight or curved, pedestrian): Plastic for curves; aluminum for long straight runs
- Driveway or vehicle access: Poured concrete curb or hybrid aluminum with wide stakes
- Mixed-use or complex grade: Hire a professional; drainage and base design matter more than restraint type alone
How to install a paver edge restraint step by step
The sequence matters as much as the product. Get it wrong and the restraint fails regardless of what you bought.
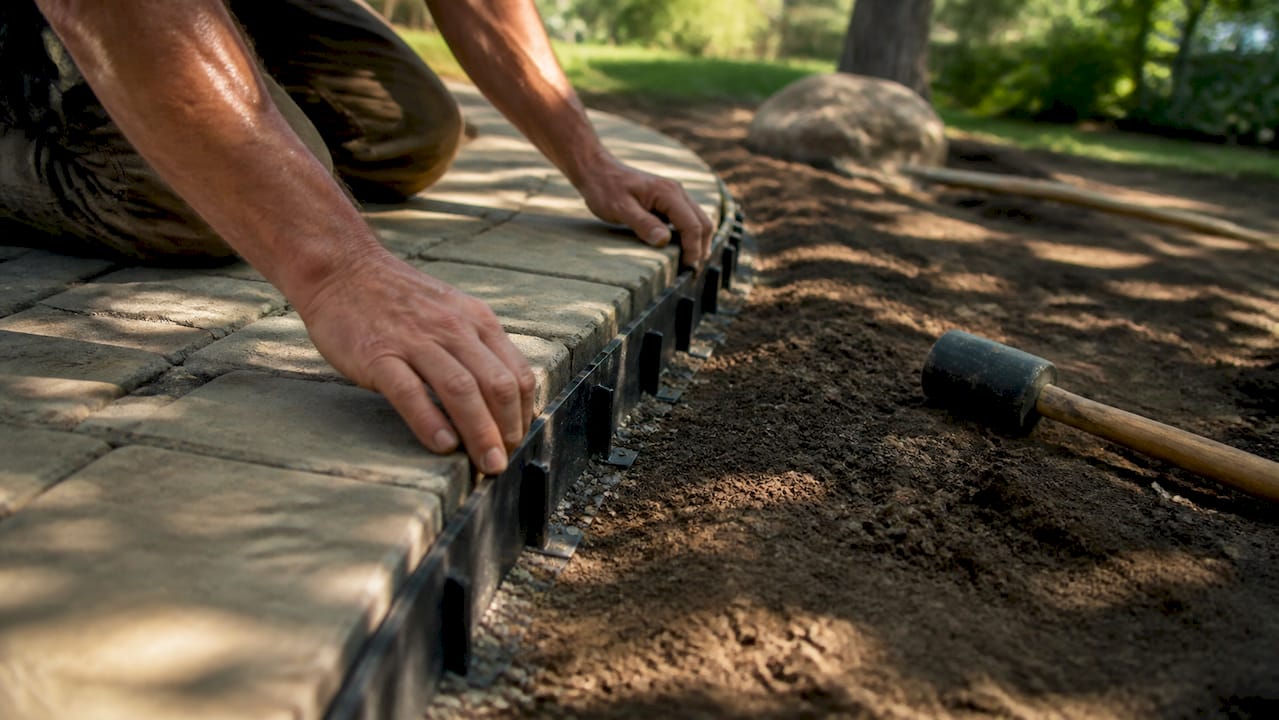
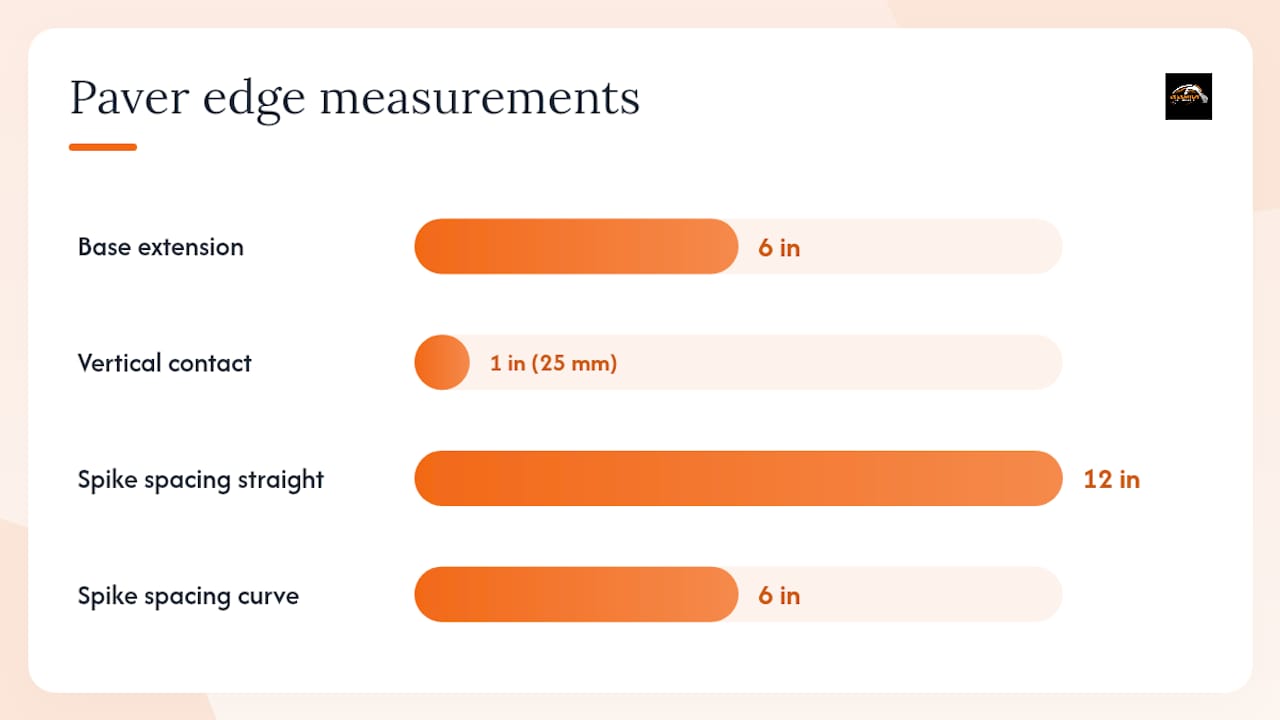
- Grade and compact the base. The compacted aggregate base must be fully set before any restraint goes down. Snap Edge installation specs require the base to extend at least 6 inches beyond the edge of the pavers — that extension is what the spikes anchor into.
- Set the restraint on the compacted base. Place the edging strip or aluminum channel directly on the compacted aggregate, flush against where the paver edge will sit. Never place it on top of the bedding sand — the CMHA technical guidance and Unilock’s installer notes both flag this as the most common installation error.
- Install the field pavers. Lay pavers up to the restraint face before driving spikes. This lets you confirm contact between the paver side and the restraint face.
- Verify contact. The restraint should touch the paver side along its full vertical face. CMHA guidance specifies a minimum of 1 inch (25 mm) of vertical contact between the restraint and the paver edge for typical residential use.
- Drive spikes or anchors. For standard residential patios and walkways, space spikes every 12 inches on straight runs. Tighten to every 6 inches on curves and corners. Unilock’s installation guidance is clear: spikes must penetrate well into the compacted aggregate base — not into uncompacted soil, and never into the bedding sand layer.
- Add extra fasteners at corners. Inside and outside corners get at least two spikes within 2 inches of the corner point. For curves, cut plastic edging with a utility knife rather than forcing it, which creates stress points.
- Final compaction. Run the plate compactor over the entire surface, including close to the edges, to lock joint sand and seat everything firmly.
Pro Tip: Before driving the last spike, push firmly on the paver face nearest the restraint. If you feel any lateral give, the restraint isn’t seated properly — add a spike and recheck. A gap between the restraint face and the paver side is where joint sand starts migrating.
Tools and materials you’ll need before you start
Get everything on-site before the base is compacted — stopping mid-job to make a hardware run is how mistakes happen.
Tools:
- Plate compactor (rent from a local equipment yard)
- Hand tamper for tight spots near edges
- Masonry saw or paver splitter for cut pieces
- Hammer or rubber mallet
- Tape measure and chalk line
- 4-foot level
- Drill with masonry bit (for rigid base anchoring)
- Wheelbarrow
Materials:
- Paver edge restraint strips or channels (Snap Edge, ProFlex, or hybrid aluminum such as Quick-E from Pave Tool)
- 10-inch galvanized spikes (typically sold separately; check product listing)
- Compacted aggregate base material (if adding to existing base)
- Polymeric joint sand
- Geotextile fabric (if sand migration is a risk in your soil type)
- Concrete mix (if pouring a curb restraint)
- Precast concrete edging units (if using precast)
Safety PPE:
- Safety glasses
- Work gloves
- Hearing protection when running the plate compactor
- Steel-toed boots
What do industry standards say about edge restraint installation?
The CMHA doesn’t treat edge restraints as a finishing detail. They’re structural, and the tech note language reflects that:
That base-extension rule is one contractors get wrong most often on DIY-adjacent jobs. If your base is 6 inches thick, the compacted aggregate needs to extend 6 inches beyond the spike line — not just to the spike, and not just to the paver edge.
Anchoring into rigid bases: When pavers are installed over an existing concrete slab, spikes won’t work. The correct method is drilling into the concrete and using expansion anchors or powder-actuated fasteners to secure the restraint channel. Mix aluminum restraints with stainless steel or coated fasteners only — bare steel against aluminum creates galvanic corrosion that will eat the connection over time.
Drainage: A restraint that traps water against the paver edge accelerates freeze-thaw damage in climates like Kansas City’s. Turn the geotextile fabric up behind the restraint if sand migration is a concern, and confirm the surface drains away from structures before final compaction.
Common mistakes that cause edge restraints to fail
Most paver edge failures trace back to a short list of installation errors, not product quality.
- Installing on bedding sand. The single most common mistake. The restraint has nothing solid to anchor into, and spikes pull out under the first freeze cycle.
- Insufficient spike depth or spacing. Spikes driven only partway into the base, or spaced too far apart on curves, let the restraint flex outward under lateral load.
- Gaps between restraint and paver face. Even a small gap lets joint sand migrate out, which leads to sunken pavers and widening joints over time.
- Using landscape edging instead of structural restraint. Flat plastic landscape edging and timber borders are not rated for interlocking pavers. Unilock’s guidance specifically warns against these as substitutes.
- Not extending the base past the spikes. Spikes driven into the edge of the base — rather than into the middle of an extended base — pull out easily.
How to spot a failing restraint: Look for bulging at the paver perimeter, joints that are visibly wider than the field, sand loss at the edge, or pavers that rock when you step on them. These are signs the restraint has already moved.
Repair options:
- Re-drive loose spikes or replace with longer ones if the base is still solid.
- Add supplemental stakes between existing ones if spacing was the problem.
- For short sections where the base has eroded, a bagged polymer-modified concrete mix can stabilize the edge without full removal.
- If you’re seeing large-scale shifting, repeated stake pullout, or base erosion across a long run, that’s a full reset — remove the edge section, regrade and recompact the base, and reinstall.
When should you DIY vs. hire a professional?
Plastic snap-edge on a small backyard patio or a curved garden walkway is genuinely DIY-friendly. The tools are rentable, the product is forgiving, and the stakes (literally and figuratively) are low if you need to adjust.
The math changes fast in a few situations:
- Vehicle loads. A driveway or parking pad needs concrete or hybrid aluminum anchored correctly. Getting this wrong means resetting the whole edge after the first winter.
- Poor drainage or complex grading. If water pools near the paver edge or the grade isn’t clearly established, the restraint problem is actually a drainage problem. Fixing the symptom without the cause just delays the failure.
- Large-scale runs. A 200-foot straight driveway edge in aluminum requires precise layout, consistent base depth, and a compactor run that a solo DIYer can’t easily manage.
- Rigid base anchoring. Drilling into concrete and setting expansion anchors correctly takes experience. A missed anchor or wrong fastener type creates a failure point.
- Permit requirements. Some municipalities require permits for hardscape work above a certain square footage. A professional handles that process.
Quick checklist — hire a pro if:
- Vehicles will use the surface
- The base has drainage or grading complications
- The run is longer than you can compact in a single session
- You’re anchoring into an existing concrete slab
- The project is part of a larger outdoor living build
GC Signature Outdoors LLC handles the hard parts of paver installation

Snap edge on a small patio is one thing. A full paver patio, outdoor kitchen, or fire pit build with proper drainage, compacted base, and correctly anchored edge restraints across a complex layout is another. GC Signature Outdoors LLC installs paver patios, concrete flatwork, and complete outdoor living spaces across the KC Northland area — Smithville, Platte City, Kearney, and surrounding communities. Every install includes proper base prep, correctly spaced and anchored restraints, and final compaction done with professional-grade equipment.
If you’re looking at a driveway, a large patio, or a project where the grade or drainage isn’t straightforward, skip the callbacks and get it built right the first time. Request an estimate or browse completed projects to see what a professional paver install looks like from start to finish.
Sources
These pages are worth bookmarking before you buy materials or start layout:
- Edge Restraints for Interlocking Concrete Pavements - CMHA
- Snap Edge Installation Specifications - SEK
- Edge Restraints: The differences, pros and cons - Polycor
- What You Need to Know About Edge Restraints - Unilock
- Edge restraints for hardscapes - EZG Manufacturing
FAQ
Do you need an edge restraint for pavers?
Yes. Edge restraints are required on every exposed paver perimeter. Without one, lateral forces from traffic and freeze-thaw cycles will push pavers outward, widen joints, and cause the surface to fail over time regardless of base quality.
What is the best edge restraint for pavers?
For most residential patios and walkways, plastic snap-edge (Snap Edge or ProFlex) is the practical choice. Driveways and vehicle areas need poured concrete or hybrid aluminum edging with wide stakes for adequate load resistance.
Do you install paver edge restraint before or after sanding?
The restraint goes down on the compacted aggregate base before the bedding sand is spread and before pavers are laid. Installing it after the sand is placed is the most common DIY mistake and leads to spike pullout.
How do you secure the edge of pavers?
Drive 10-inch galvanized spikes through the restraint flange into the compacted base, spaced 12 inches apart on straight runs and 6 inches on curves. Spikes must penetrate the compacted aggregate base fully, not just the soil or sand layer.
How do you fix pavers that are sinking or spreading at the edge?
First check whether the restraint has pulled away from the paver face or the spikes have backed out. Re-drive or replace loose spikes, add supplemental stakes if spacing was too wide, and reset any sunken pavers by pulling them, adding base material, and re-compacting before relaying.
Recommended
Ready to get started in Kansas City's Northland?
GC Signature Outdoors serves Smithville, Platte City, Kearney, Liberty, and surrounding areas.